MATERIALS NEEDED
| Material | How I Use It |
| Square Paper | I choose paper that’s the same length on all sides. Bright colors or patterns make the heart look super fun! If I want a giant heart, I use larger paper. Thin paper is easier to fold, but sometimes I try thicker paper for a sturdier heart |
| Optional: Ruler | A ruler helps me press the folds to make them super sharp. I also use the edge to line things up before folding. When I don’t have one, I use finger nail instead |
| Optional: Pens, Crayons, or Stickers | After folding, I like to make each heart unique. I draw smiley faces, write kind notes like “You made my day!” or decorate with rainbow stickers and glittery stars. Sometimes I color the wings or outline the edges for a cool effect. |
| Optional: Googly Eyes or Small Gem | These are super fun for turning your heart into a character! I glue on googly eyes and pretend my heart can talk. Tiny gems or rhinestones make it sparkle like magic. Great for gifts or decorations! |
STEP BY STEP INSTRUCTION
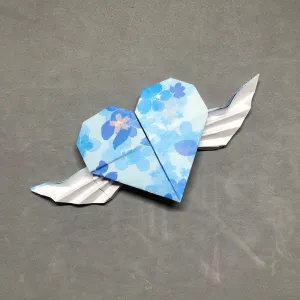
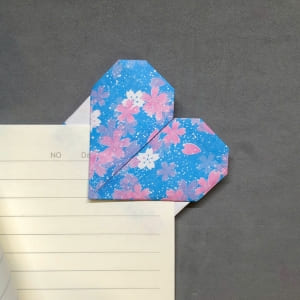
Have you ever wanted to fold a paper heart that can fly? In this fun origami project, we’ll make a heart with wings like a little message of love ready to take off! It’s cute, easy, and perfect to give to a friend, decorate your notebook, or just keep as a happy reminder. All you need is a square piece of paper and a little patience. Ready to fold some love and let it soar?
Step 1
To start, I use a square piece of paper that has a flower pattern on one side and is plain white on the other. I place the square paper with the white side facing up, the side with the pattern should face down. Then fold it in half from bottom to top.

Step 2
After making a nice fold, I open the paper back to the way it was.

Step 3
Then I fold the paper in half from right to left.

Step 4
Then I open it back up again, and now I have a plus-shaped fold.

Step 5
The middle crease goes across the paper. Now I fold the top part down to the center.

Step 6
After that, I flip the paper over.

Step 7
The center crease splits the paper in half. I fold the top-left corner of the right side down diagonally to make a triangle.

Step 8
Next, I do the same on the other side. I fold the top-right corner of the left side down to make a triangle.

Step 9
Press the folds firmly, then flip the paper over.

Step 10
I take the triangle with the pattern at the top and fold it down.

Step 11
Next, I turn the paper over once more.

Step 12
I open up the inside of the left part by lifting the top part.

Step 13
Then I lift the top-left point a bit higher and fold the left edge in to make a rectangle on the left side.

Step 14
I do the same with the right side. I start by lifting the top point up and opening the middle part.

Step 15
Now I fold the right side to make another white rectangle, just like the one on the left.

Step 16
Now I take the top-left corner and fold it down along the crease to make a little triangle.

Step 17
And I fold the top-right corner down to make the second triangle.

Step 18
For the rectangle on the left, I fold the top-right corner down to make another triangle.

Step 19
Now do the same with the right rectangle, fold the top-left corner down to make the last little triangle.

Step 20
After that, i take the top-left tip and fold it down to make a tiny triangle.

Step 21
Do the same with the top-right corner to make another small triangle.

Step 22
For the bottom-left corner, I fold it up diagonally to make a big white triangle.

Step 23
Same with the bottom-right corner, I fold it up diagonally to make the second big triangle.

Step 24
Now I fold the bottom part up, following the folds, to make one big triangle at the bottom.

Step 25
After making a nice crease, I fold the big triangle at the bottom back down.

Step 26
And open the two small triangles on the sides.

Step 27
Do you see the horizontal crease in the middle of the paper? On the left side, I fold the bottom-right corner (made by the crease) up.

Step 28
Then I do the same on the right side, so both sides look the same.

Step 29
After that i use my two thumbs to push the bottom of the paper up.

Step 30
I will adjust the paper to make it even, and fold the bottom part up to make an upside-down trapezoid. If you look at the folds we made before, you’ll see that this trapezoid is made from three triangles at the bottom.

Step 31
After we have nice and neat folds, I fold the bottom of the trapezoid up to make a smaller trapezoid.

Step 32
Then I pull the part I folded earlier back down to its old position. Do you see the fold in the middle of the trapezoid? That means the fold is correct.

Step 33
Now let’s fold the white part at the bottom up, so it touches the fold in the middle we just made.

Step 34
After I make a nice fold, I open the part I just folded. There’s a small fold going across, a little lower on the paper.

Step 35
I fold the white bottom part up again, so it touches the small horizontal fold I just made at step 34.

Step 36
I turn the paper so the folded part is on top. Then I flip it over. Now I can see a triangle with flowers at the bottom, and a trapezoid on top.

Step 37
Now I take the white trapezoid on top and fold it down, using the little fold line that’s already there.

Step 38
Now I fold the white trapezoid down. I can start to see the two top points of the heart.

Step 39
Now I fold the bottom of the trapezoid up just a little. It will look like little steps stacked on top of each other.

Step 40
Now I fold the big white trapezoid (that’s upside down) up to the top.

Step 41
Then I fold the top part of the trapezoid down a bit more, along the fold we already made.

Step 42
Now I fold the big white trapezoid back down again. And I fold the bottom part up one more step.

Step 43
Then I lift up the big white trapezoid.

Step 44
And I fold it down to add one more step that’s the same width.

Step 45
Now I gently pull all the little steps down a bit to get ready for the heart’s wings.

Step 46
I use my right hand to pinch the middle part of the wing.

Step 47
Then I use my left hand to open the left wing and pull it down, adjusting it to make the wing look nicer.”

Step 48
Now do the same with the right wing. Use your left hand to hold the middle of the wing, and use your right hand to pull the right wing down.

Step 49
After holding the center tightly and making both wings look nice and even, I’m ready to make the wings softer and smoother.

Step 50
By pressing down a little on the top of the left wing and lifting the outer left corner up a bit, I made one beautiful wing.

Step 51
Now I do the same with the right wing, press down on the top part and lift the top right corner a little.

Step 52
Then I flip the paper over and I’ve finished my origami heart with wings

TIPS FOR BETTER RESULT
| Tips | Result |
| Start with a perfect square | This makes the folds match better, so your heart looks nice and even |
| Patterned Square Paper | your origami heart with wings looks extra special, The colorful side shows on the outside, making the heart more fun and eye-catching |
| Fold slowly and carefully | Taking your time helps the wings and heart look neat, not messy. |
| Decorate it your way | Draw cute faces, write kind messages, or stick on stars. It’s your heart, make it special! |
| Keep the paper clean | Dirty or wet hands can make the paper look wrinkled or stained. Clean hands help your heart stay pretty |
| Practice first | Try with an old paper before using your favorite one. You’ll get better each time you fold. |

CONCLUSION
And that’s it, you’ve just made your own origami heart with wings. Isn’t it fun to see how a simple piece of paper can turn into something so cute and full of love? You can make more hearts in different colors and sizes, or even write secret messages on the back.
Give one to a friend, hang it on your wall, or keep it in your notebook as a little reminder that kindness can fly. The more you fold, the better you’ll get, so keep creating and have fun.
