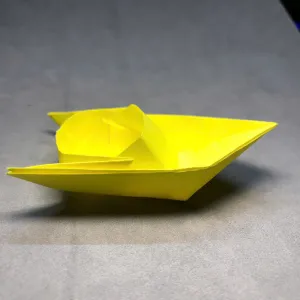
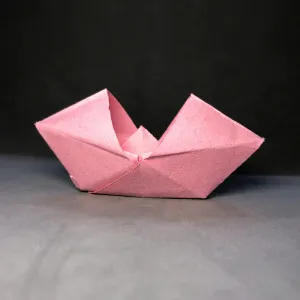
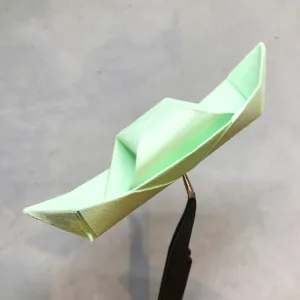
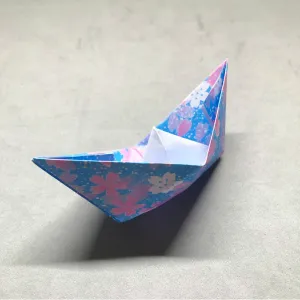
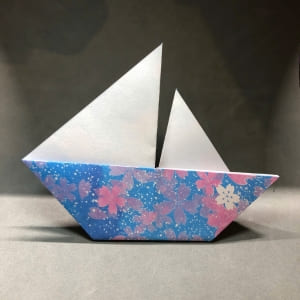
The origami canoe paper boat is one of my favorite things to make when I have some free time. It looks tricky, but it’s actually super simple. I only need one square sheet of paper to fold a cute little canoe. You can even decorate it with colors or stickers to make it your own. If you want to try it too, let’s get started.
Materials & preparation
| Material | How I Use It |
| Square paper | I use one square sheet of paper. It can be plain, colored, or have fun patterns. I like using 15×15 cm (about 6×6 inches) because it’s easy to fold. |
| Scissors (optional) | If my paper isn’t a perfect square, I use scissors to cut it to the right shape. I ask an adult to help if the scissors are sharp. |
| Ruler or fingernail | I sometimes use a ruler or my fingernail to press the folds and make sharp creases. This helps my canoe hold its shape better. |
| Flat surface for folding | I fold on a table or desk so the paper stays flat and my folds are neat. It also helps me follow each step more easily. |
Step-by-step instructions
Before we start folding, I want to tell you something fun! I made this canoe using just one square sheet of paper. It was really cool to see how a flat piece of paper could turn into a little boat. If you follow along with me, step by step, you can make your own canoe too. Don’t worry if it’s not perfect the first time, we’re just here to have fun and try our best.
Step 1
To start making an origami canoe paper boat, I place the square paper in front of me. Then I fold it diagonally by bringing the top right corner down to touch the bottom left corner. This makes a triangle.

Step 2
Then I open it back to how it was at the beginning.

Step 3
Now I fold the paper diagonally again, but this time I bring the top left corner down to the bottom right corner.

Step 4
After making that fold, I open the paper back to the way it was. Now I have a big X-shaped crease on the paper.

Step 5
Now I bring the two side edges of the paper closer together.

Step 6: And I pull the top edge of the paper down. Following the X-shaped creases, i press it down to make a triangle.

Step 7: Now I fold the top point of the paper down to touch the bottom edge of the triangle, following the dotted line to make a small triangle.

Step 8: Then I turn the paper 90 degrees from right to left so the small triangle I just made is now on the left side of the paper.
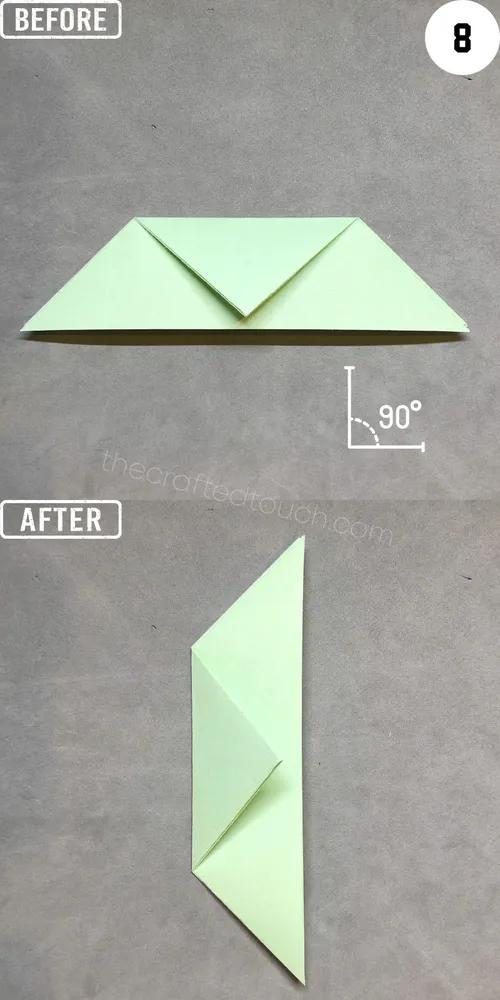
Step 9: Now I stand the paper up by lifting the right side of it so I can see the right edge clearly.
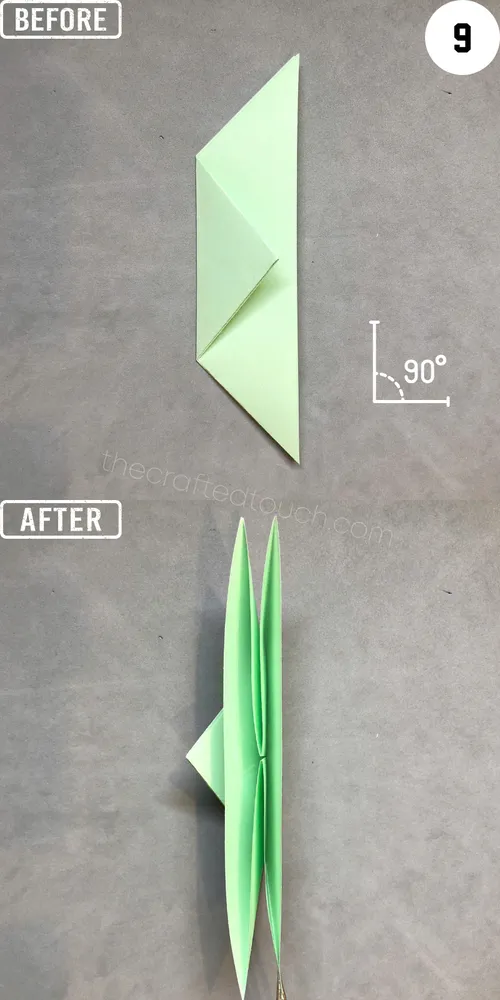
Step 10: Then I open it up by pulling the left and right edges outward.
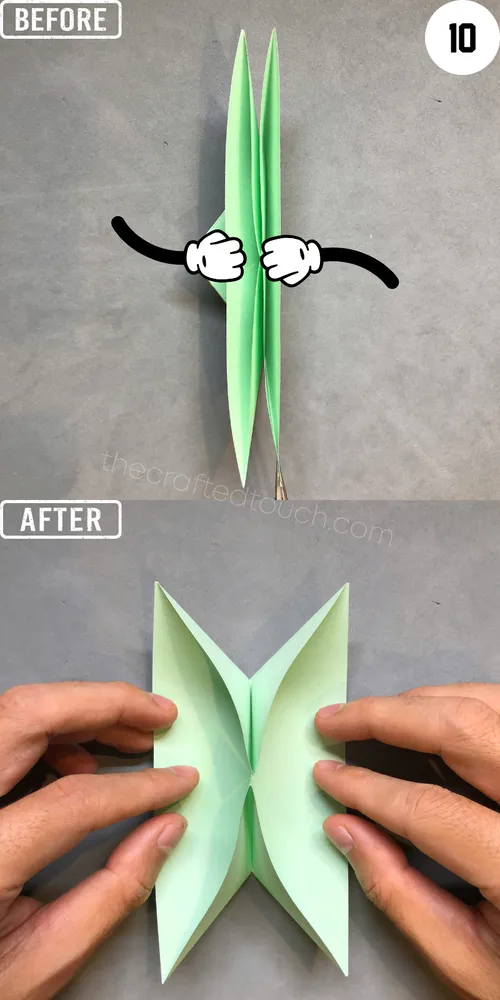
Step 11: For the bottom part, I pull the top point down and also pull the two sides that are sticking up out to the left and right to make a small triangle along the dotted line.
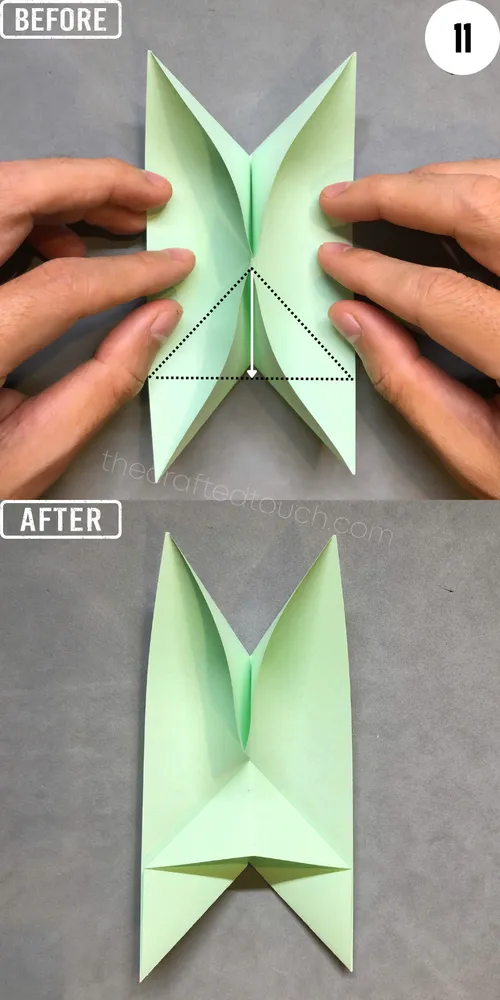
Step 12: I do the same for the top part. I pull the bottom edge up and also pull the two sides that are sticking up out to the left and right to make a second small triangle.
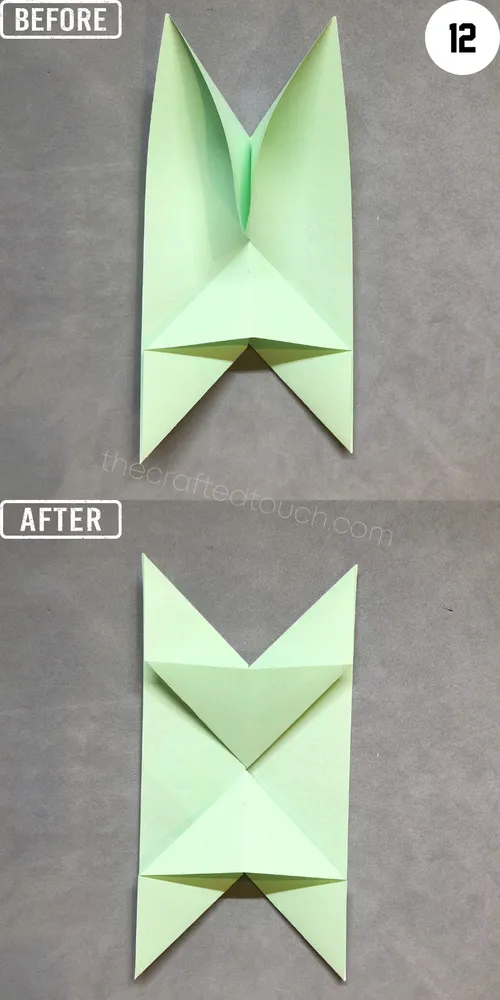
Step 13: Now I turn the paper sideways and flip it over, just like in the picture.
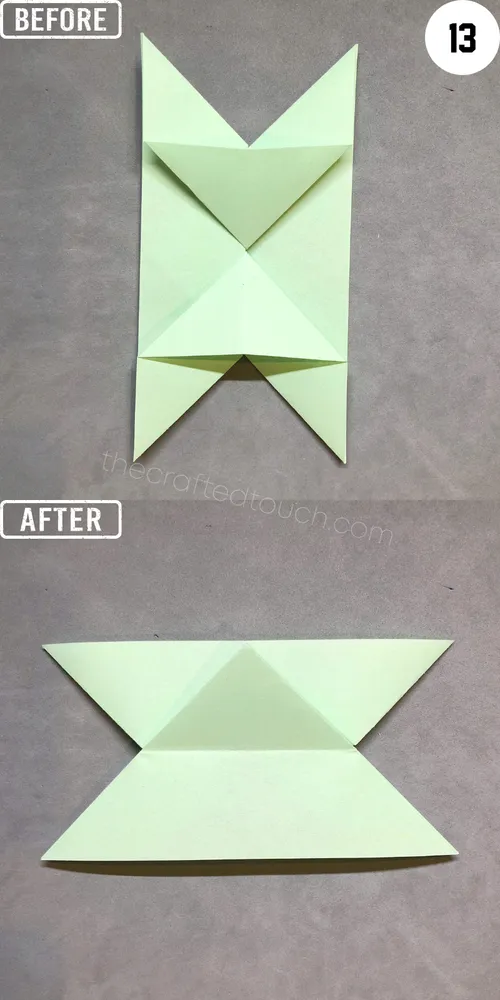
Step 14: For the bottom part, I fold it up so the bottom edge touches the horizontal crease in the middle of the paper.
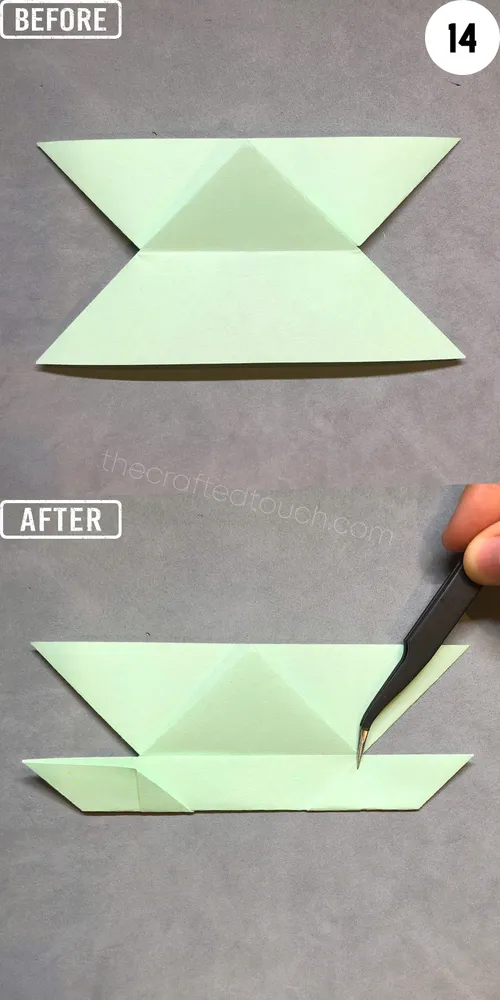
Step 15: The extra flap at the bottom right, I fold it from right to left at a right angle to make a mini triangle.
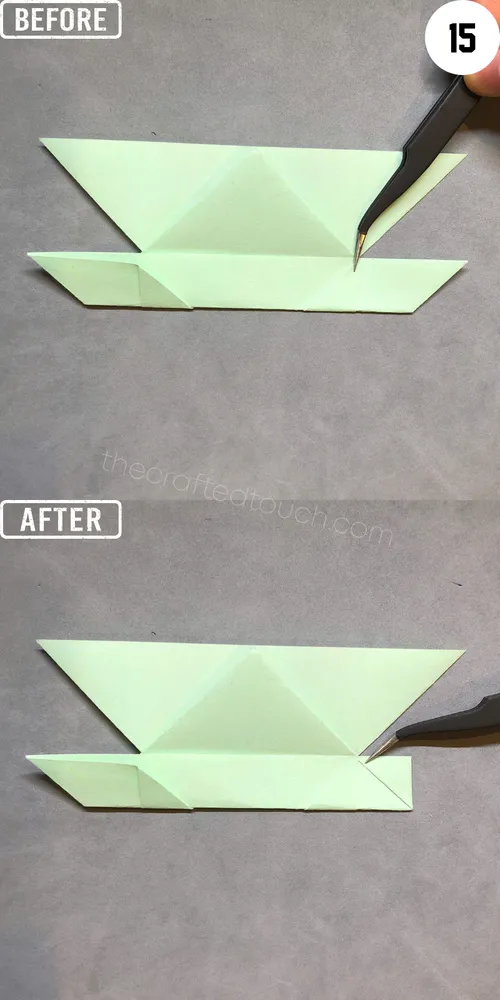
Step 16: Then I fold it diagonally down, following the edge of the mini triangle.
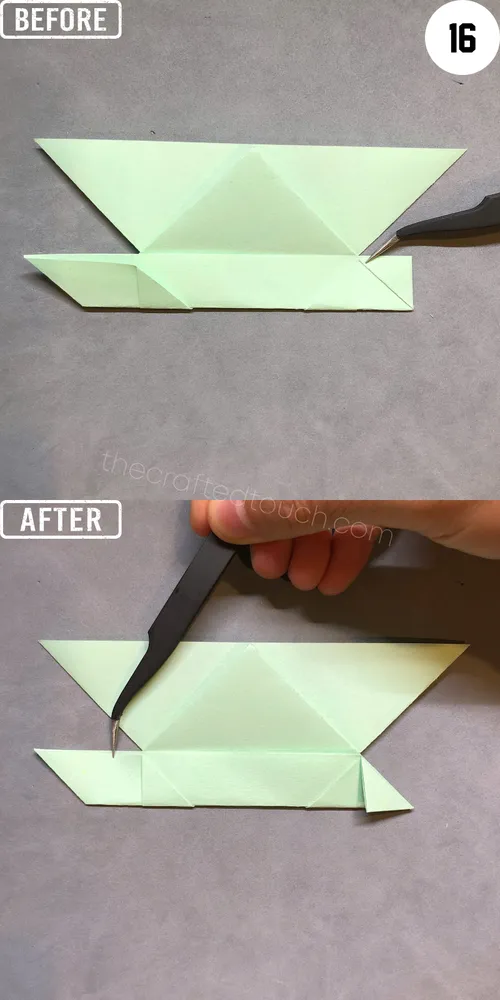
Step 17: I also fold the flap sticking out at the bottom left from left to right at a right angle to make a mini triangle.
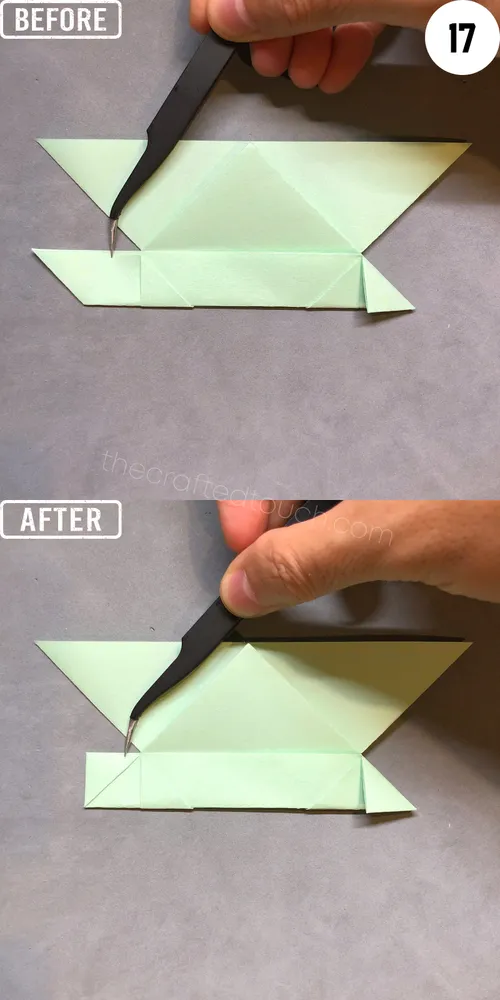
Step 18: Then I fold it diagonally down, along the edge of the mini triangle.
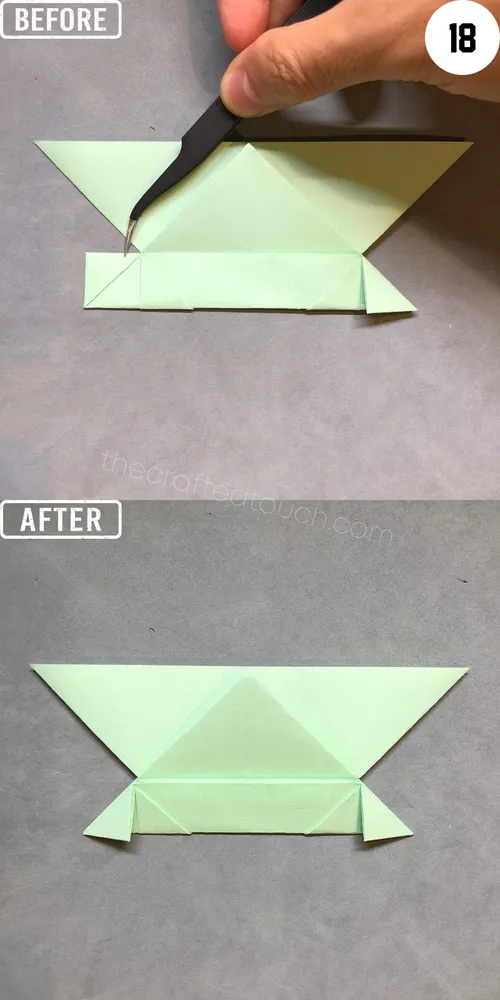
Step 19: For the triangle in the middle at the top of the paper, I flip it down.
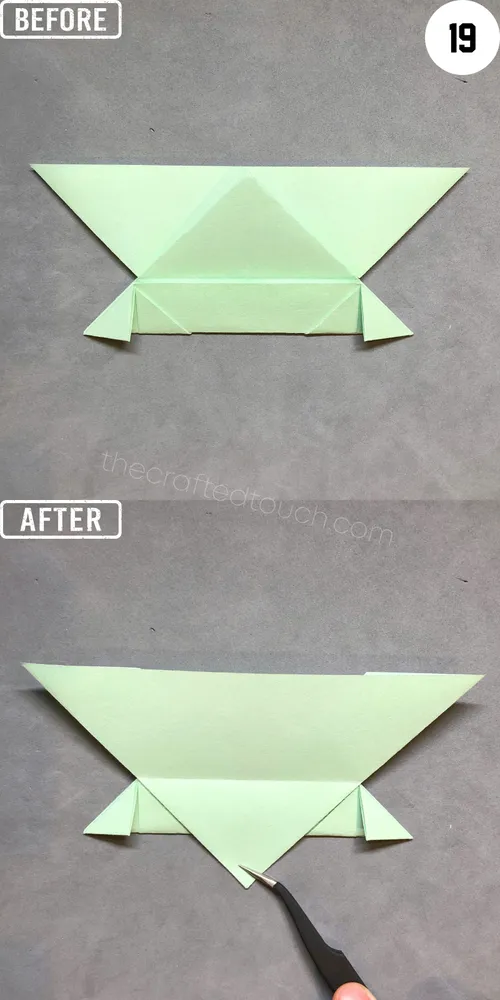
Step 20: Then I fold the top part of the paper down so that the top edge touches the edge of the triangle I just flipped.
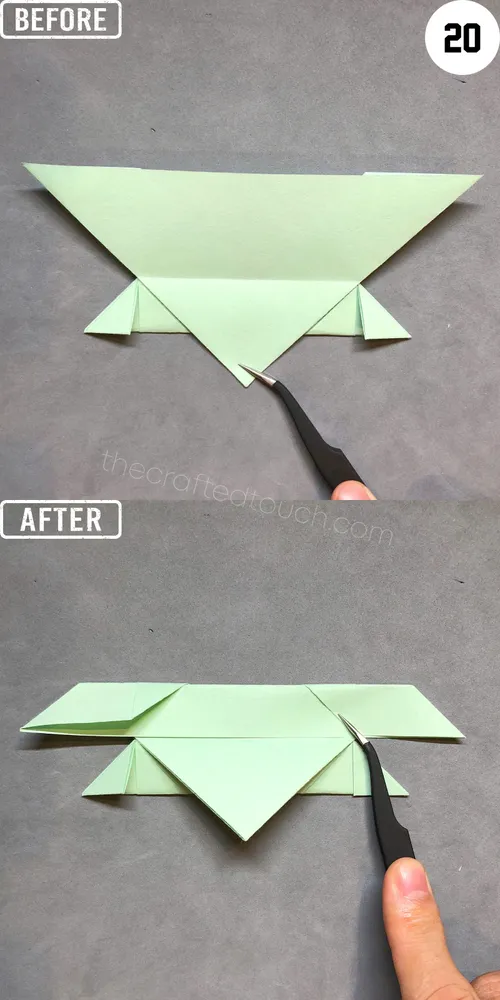
Step 21: At the top part of the paper, I fold the extra flap on the right side straight across from right to left to make a mini triangle.

Step 22: Then I fold the mini triangle up along the slanted edge it already has.
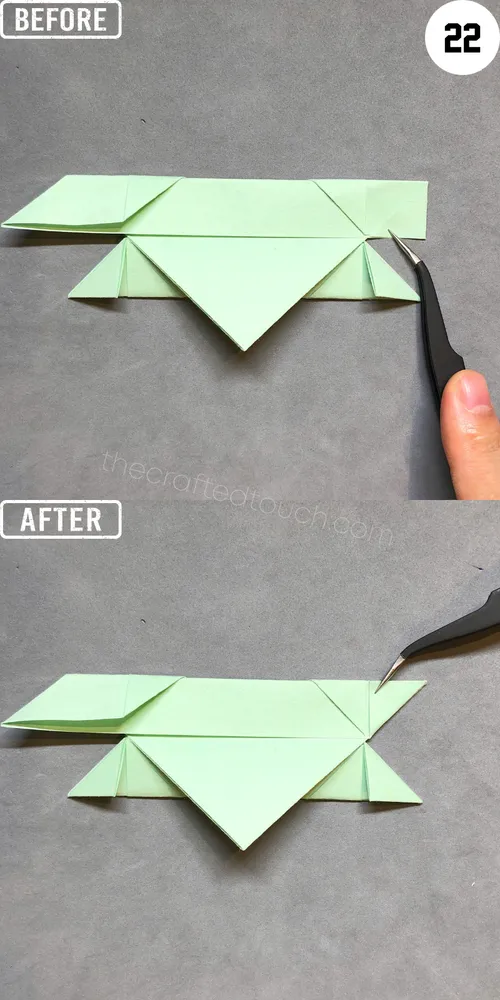
Step 23: I do the same on the left side, folding it at a right angle from left to right to make a mini triangle.
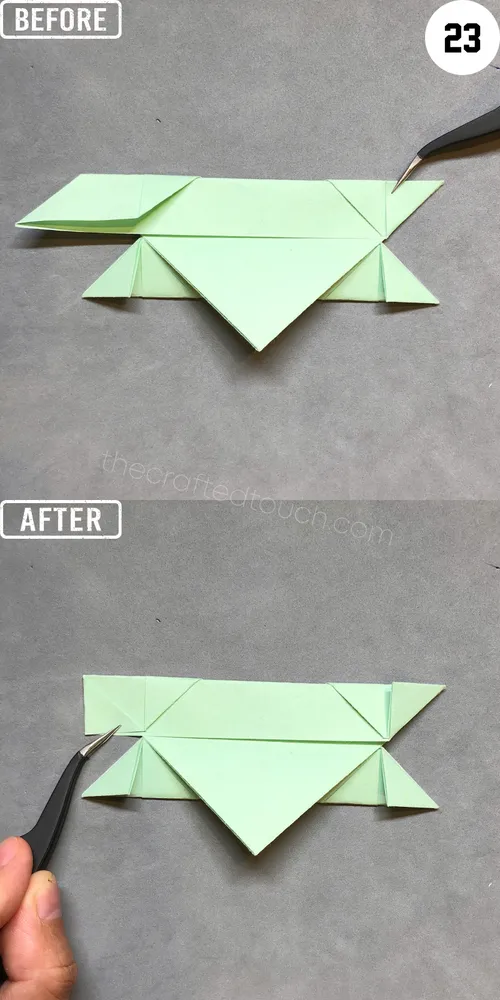
Step 24: Then I flip the mini triangle up.
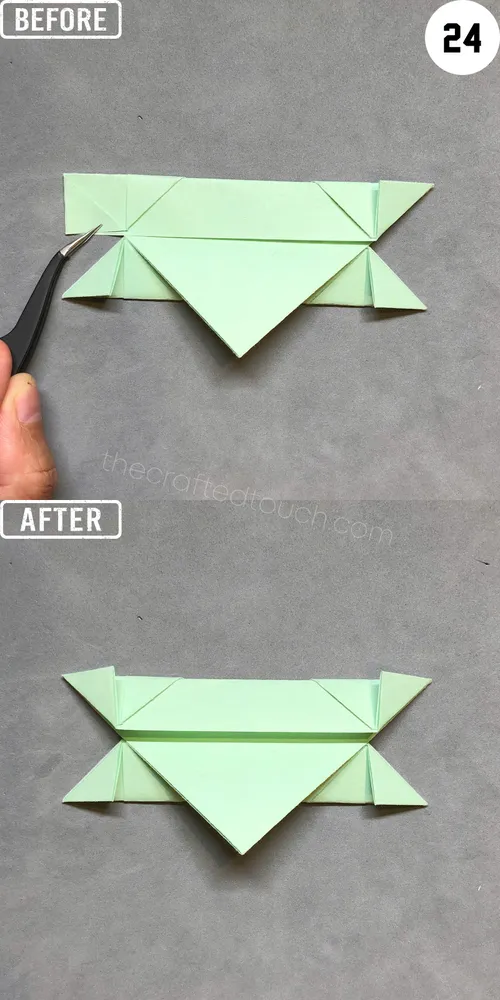
Step 25: Now I turn the paper so the pointy tip of the big triangle at the bottom faces to the left.
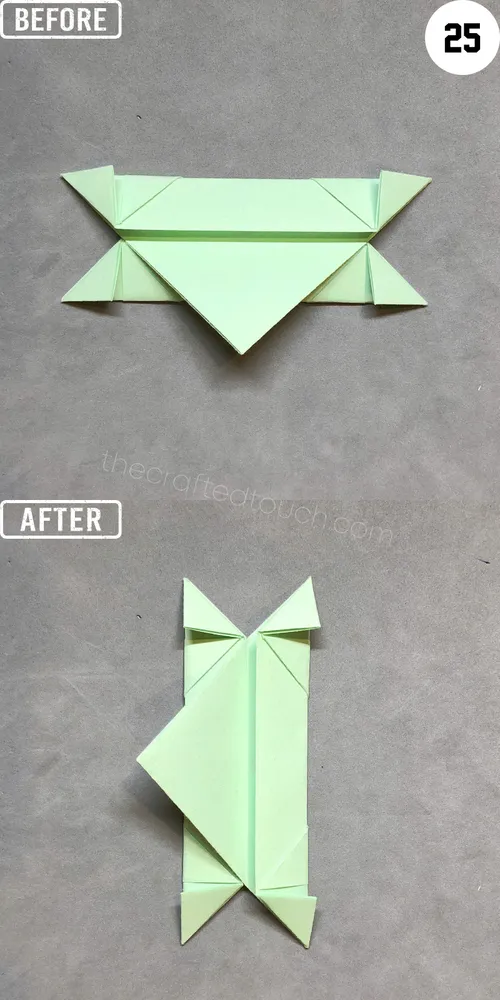
Step 26: After that, i lift the top left corner of the paper and gently open the mini triangle there a little bit.
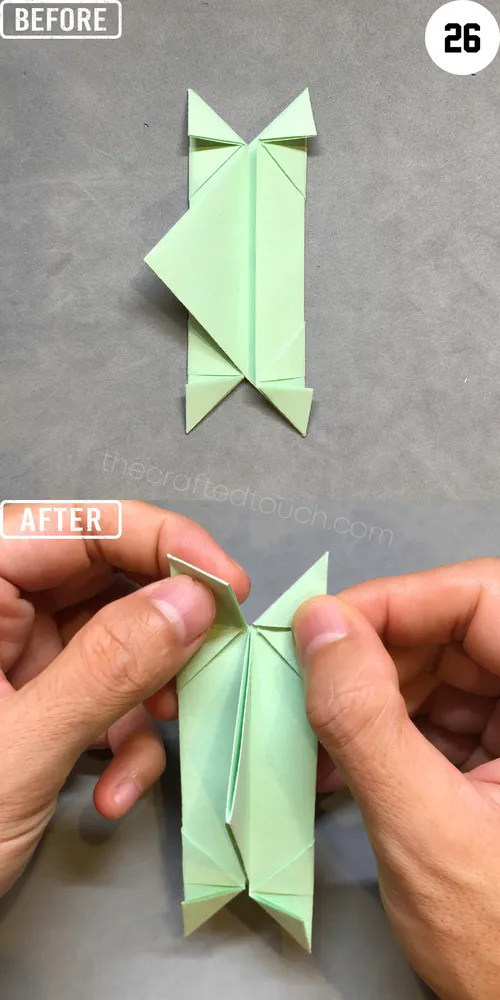
Step 27: At the same time, I lift the top right corner of the paper and open it a little to get ready to connect the left and right parts together.
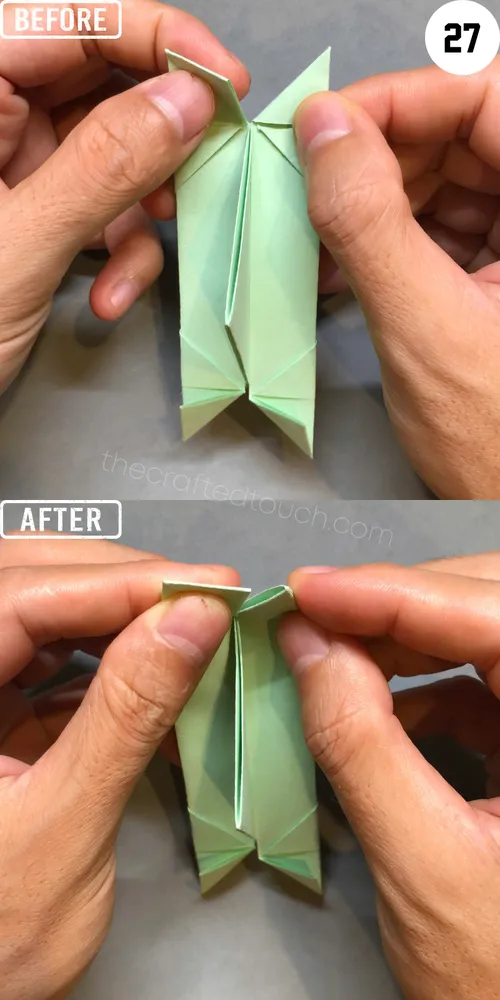
Step 28: To connect them, I tuck the mini triangle on the left into the little pocket I just opened on the right side.
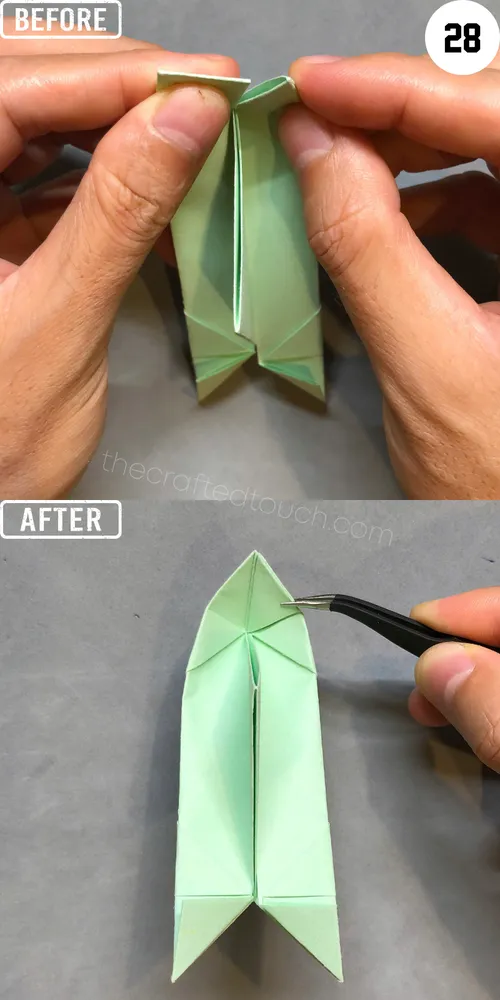
Step 29: Now I lift up the small mini triangle at the very top right side so it stands up.

Step 30: And I pull that mini triangle out from inside.
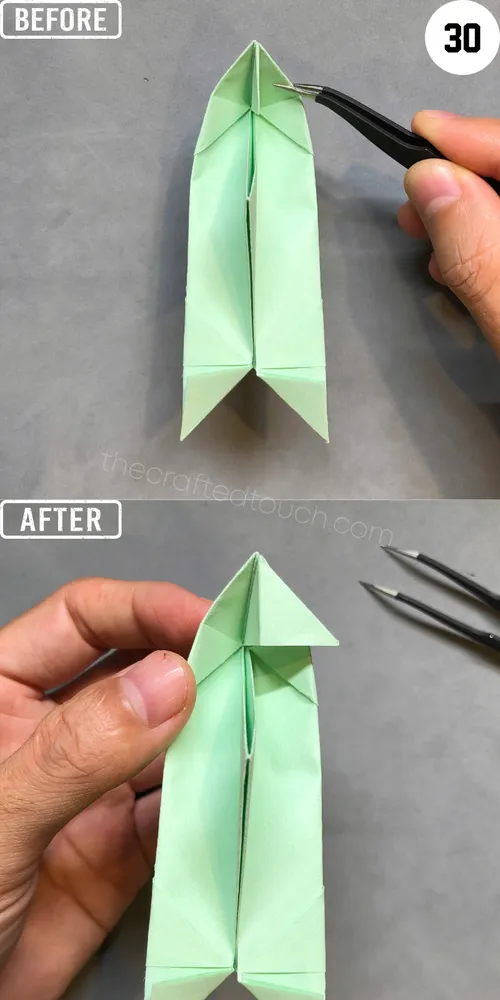
Step 31: Then I flip it over to the left side.
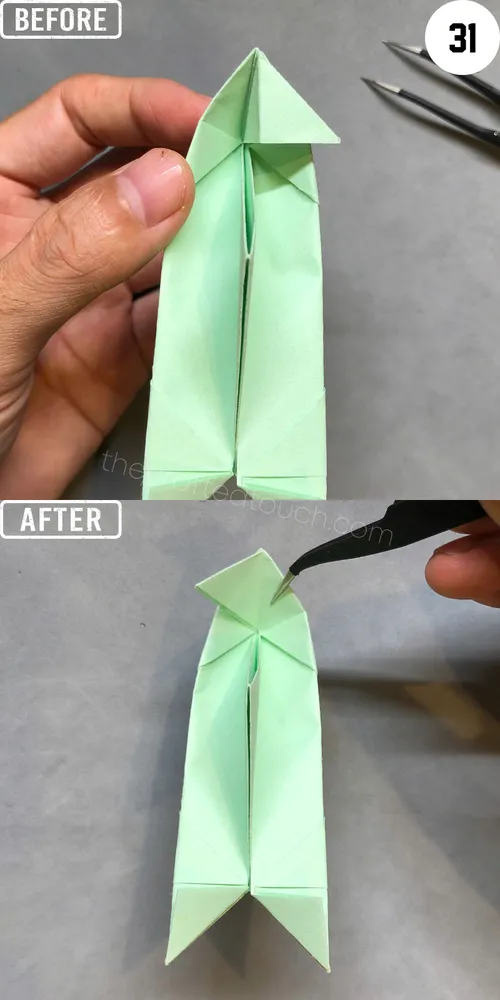
Step 32: Now I turn the paper from right to left and flip it upward so I can see the side edge of the boat.
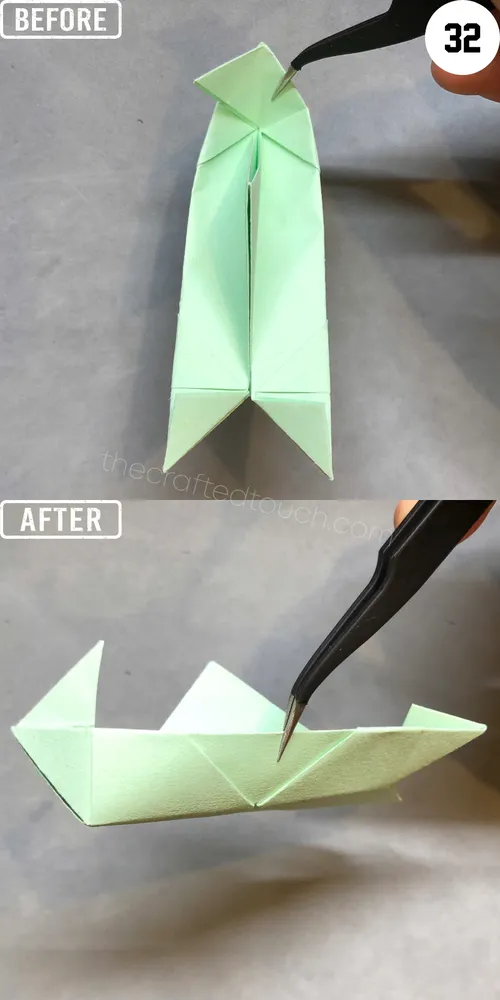
Step 33: Do you see the part sticking up on the left side? I’m going to fold it back from right to left so it can cover the entire left corner.
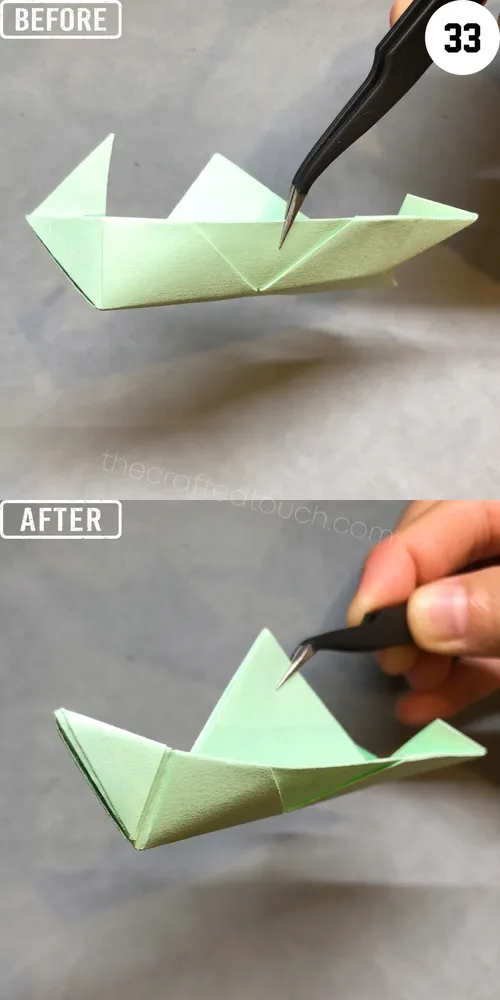
Step 34: Now I’ll do the same with the other side of the boat. I repeat step 27, open up the left side a bit, and make a small pocket on the right side.

Step 35: Then I tuck the left side into the pocket on the right side to connect them together.
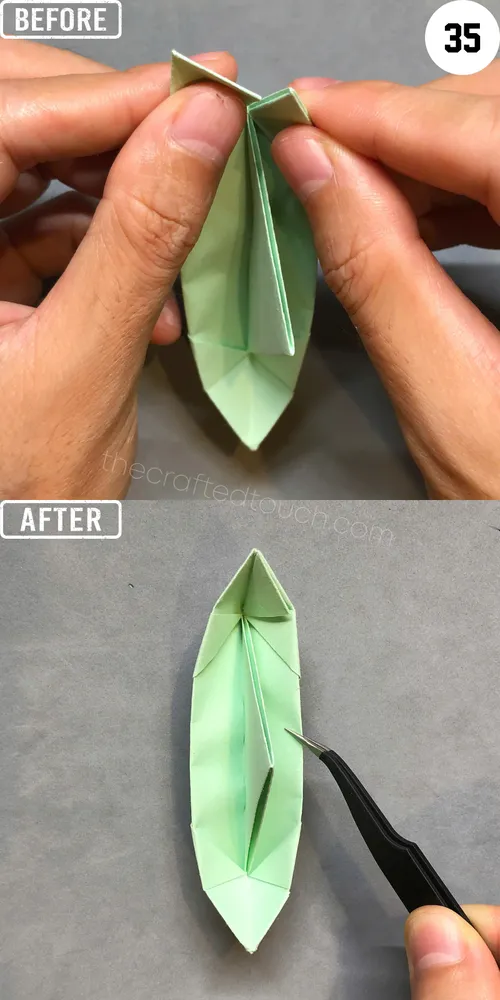
Step 36: After that, I open up the small triangle at the top.
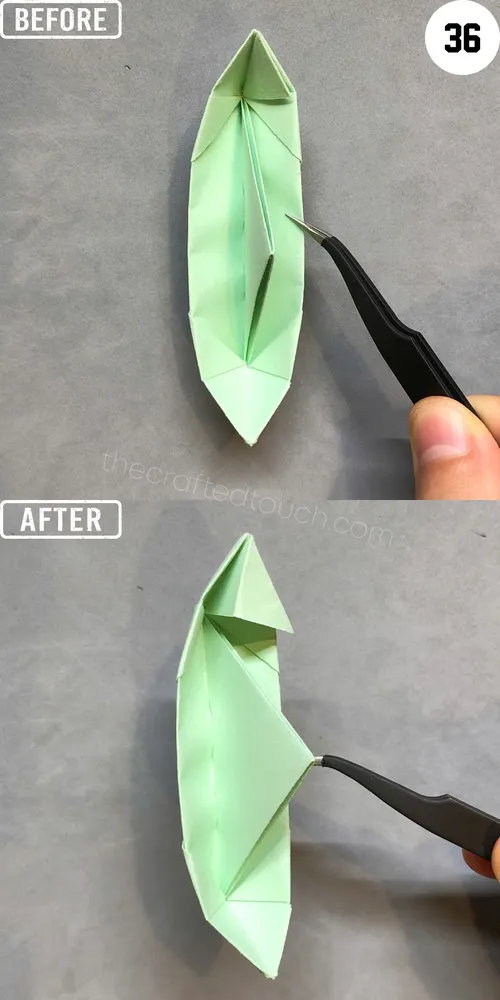
Step 37: Then I flip it over to the left side.
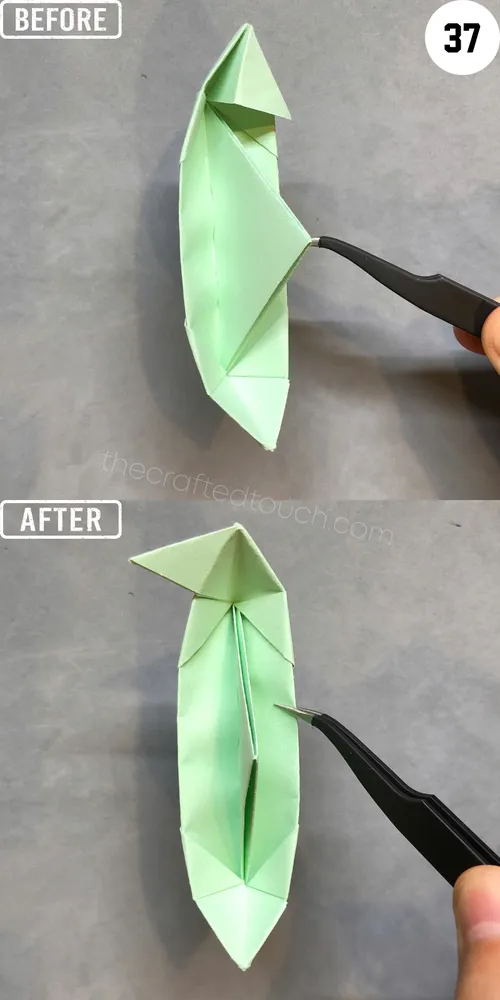
Step 38: Now I repeat from step 32. I turn the paper so I can see the side of the boat.
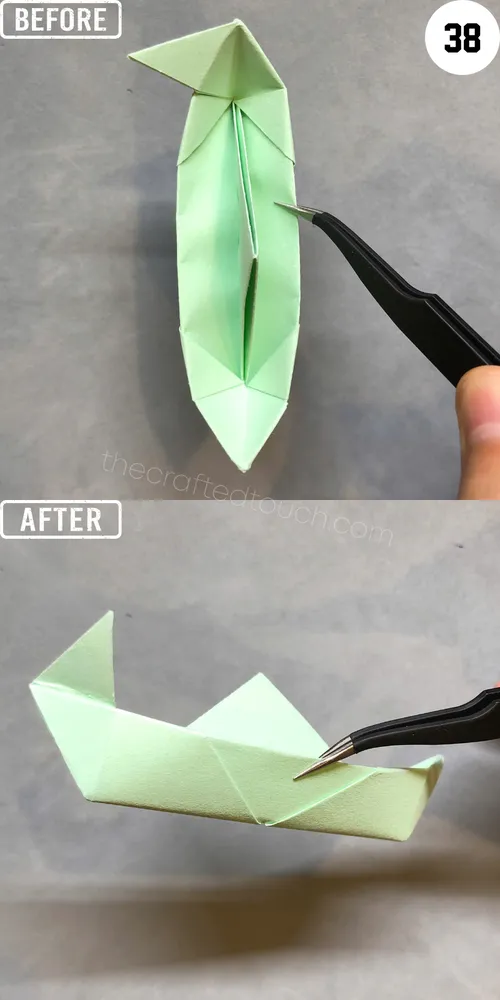
Step 39: Then I fold the part sticking up on the right from right to left so it covers the whole left side.
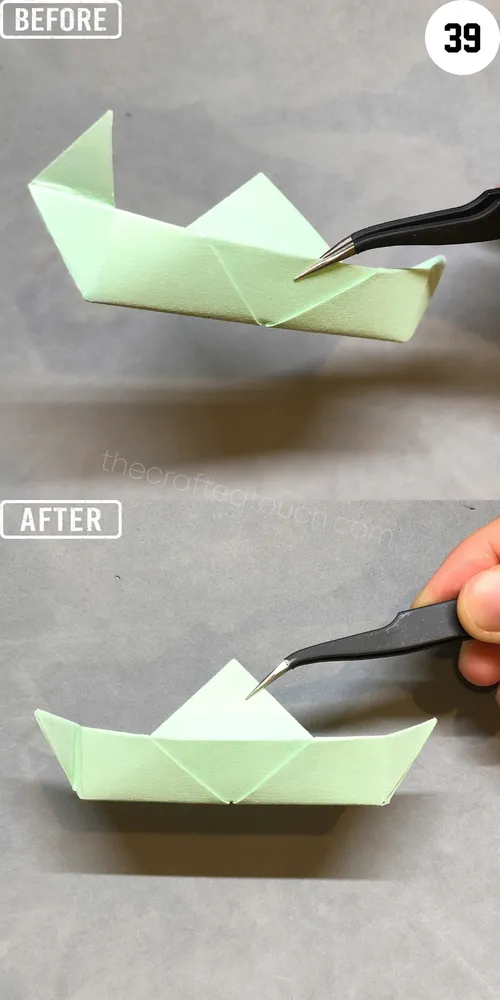
Step 40: Now it looks like a boat already, just needs a few more folds. I flip the boat upside down and turn it vertical like in the picture.
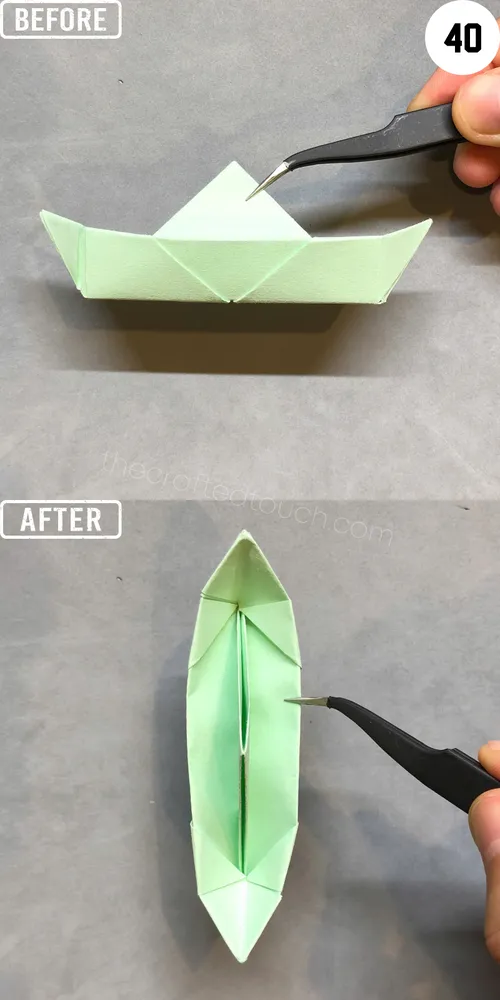
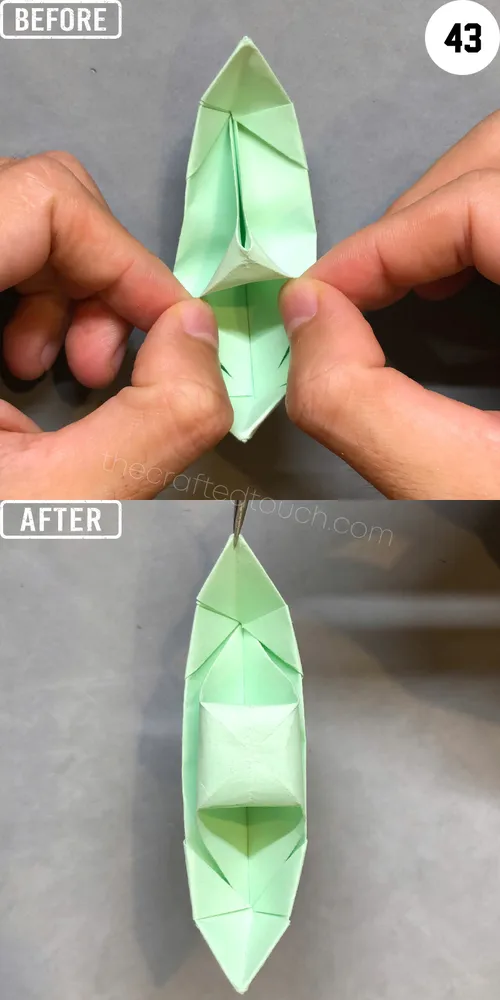
Step 41: For the part sticking up in the middle of the paper, I use my two index fingers and two thumbs to pull its edges apart into four parts.
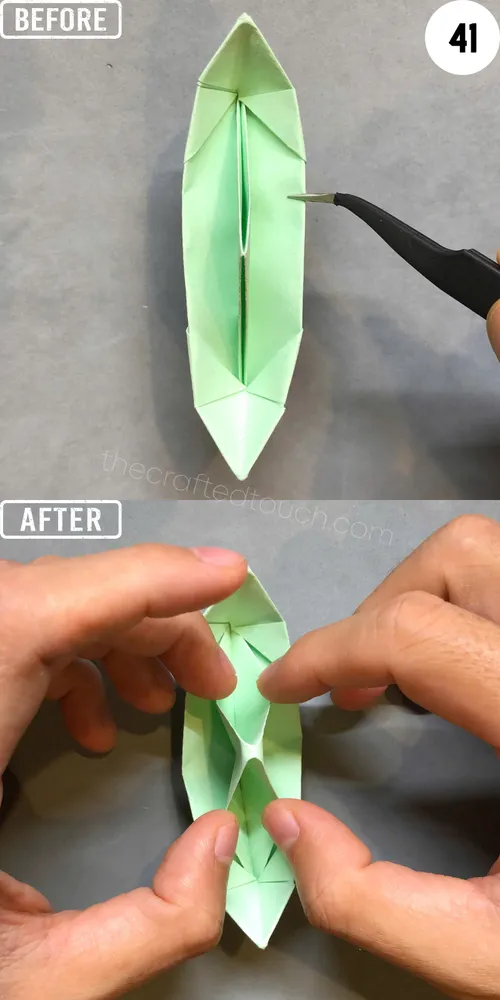
Step 42: Then I gently pull the two bottom parts outward to slowly open up the middle top point.
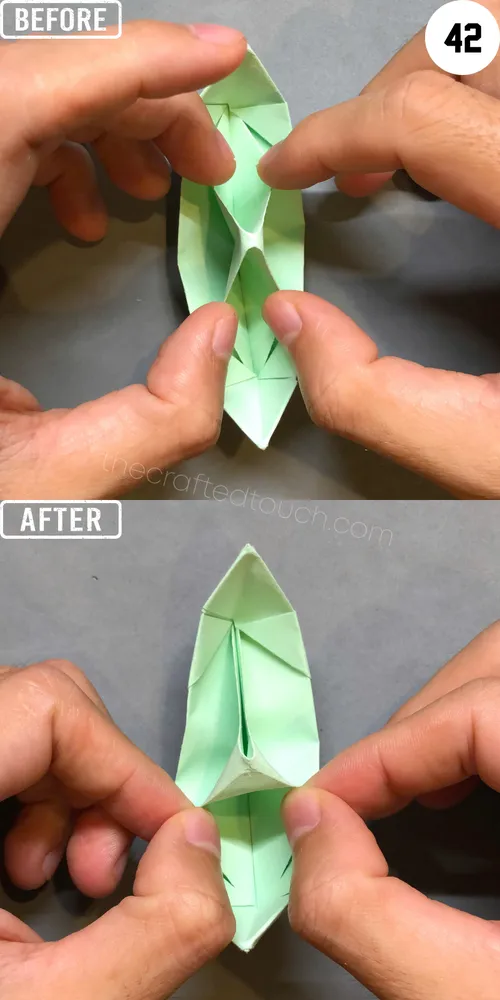
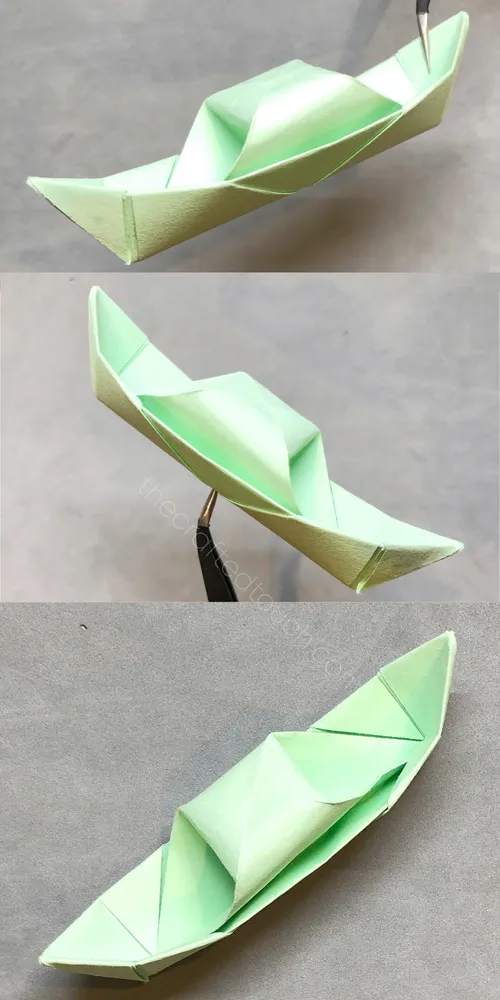
Step 43: I also gently pull the other two parts at the top. After adjusting everything carefully and evenly, I make the top point open wide and puff up, and my origami canoe paper boat is finished.
Tips for a better result
| Tip | Description |
| Make strong folds | I press each fold down firmly using my fingernail so the canoe holds its shape. |
| Go slowly and stay patient | I take my time with each fold. That helps the boat look neater and less wrinkled. |
| Fix small mistakes early | If a fold looks crooked, I unfold and fix it right away before moving on. |
| Use square paper only | This canoe only works with square paper. I always check before I start. |
| Practice with extra paper | I try a few times with old paper before using my favorite one. |
| Decorate your boat | After finishing, I sometimes draw little flags or waves on the boat for fun. |
Conclusion
I had so much fun making this origami canoe paper boat, and I hope you did too! It may look a little tricky at first, but if you follow each fold carefully, you’ll have your own cool little boat in no time.
You can float it in water, use it to decorate your desk, or even make a whole fleet to share with friends. Keep practicing, and you’ll get better with each try. Who knows what other fun paper shapes you can fold next?
