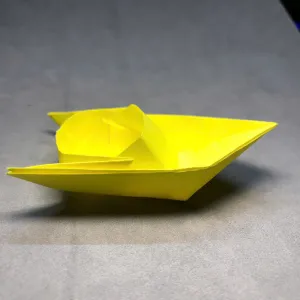
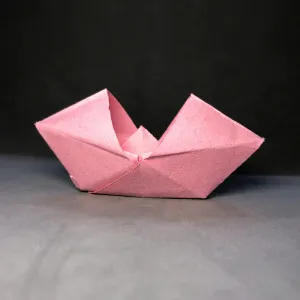
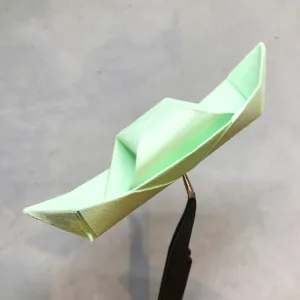
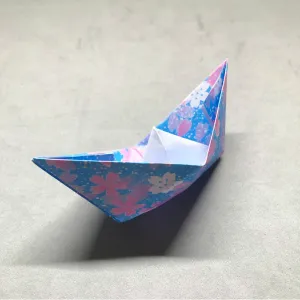
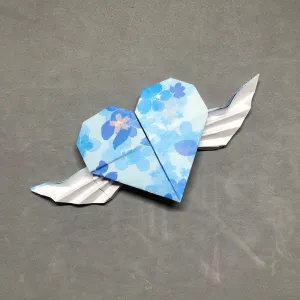
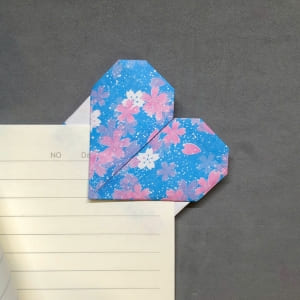
I just discovered a super cute way to fold a heart-shaped bookmark that fits perfectly into the corner of a book, and I couldn’t wait to share it with you! From choosing the right type of paper to each easy-to-follow folding step, everything is simple plus there are clear illustrations so anyone can try it. This little creation not only keeps your book pages tidy but also makes a lovely handmade gift for friends and loved ones.
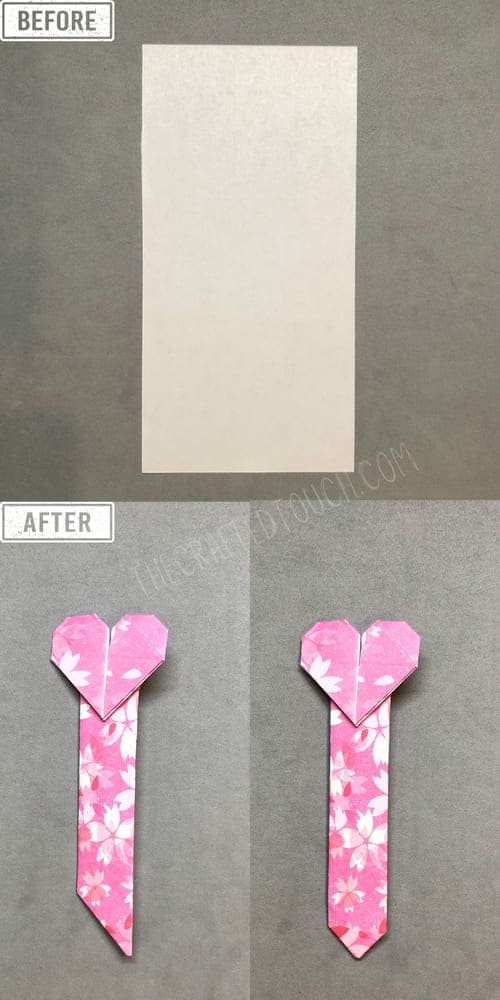
Materials & Preparation
| Material | How I Use It |
| Origami paper | I use one rectangular sheet of paper, which can be colored paper, craft paper, or patterned paper, depending on what I like. |
| Scissors (optional) | If I don’t have a rectangular sheet, I use scissors to cut the paper to the right size. |
| Ruler (optional) | Sometimes I use a ruler to measure and fold more precisely, especially for small creases. |
| Flat surface for folding | I always fold on a flat surface, like a table, so the creases come out sharper and neater. |
Step-by-step instructions
With just a small piece of paper and my own two hands, I can turn ordinary book pages into something truly special. I’m excited to begin this journey with you let’s fold a heart-shaped origami bookmark together!
Step 1
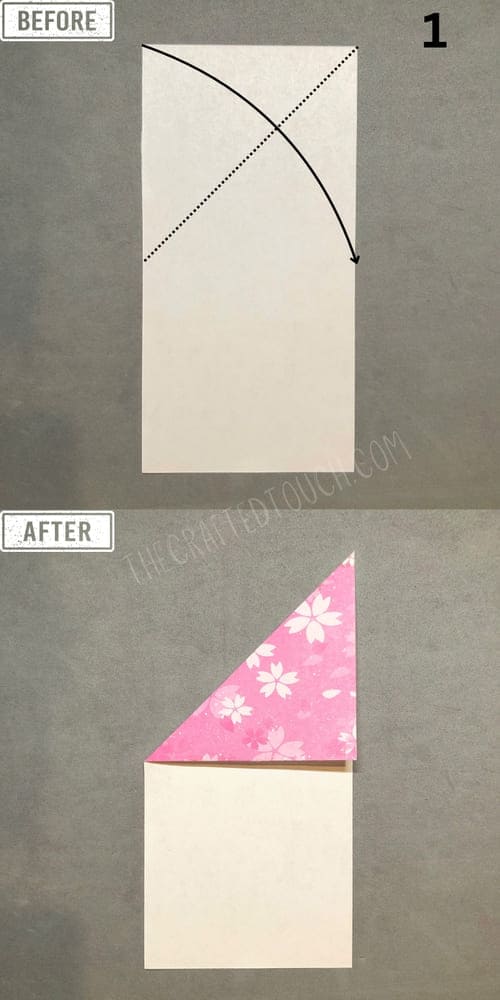
Fold the top right corner diagonally downward so that the top edge aligns with the left edge, forming a triangle. Crease firmly to make the fold sharp and straight.
Step 2
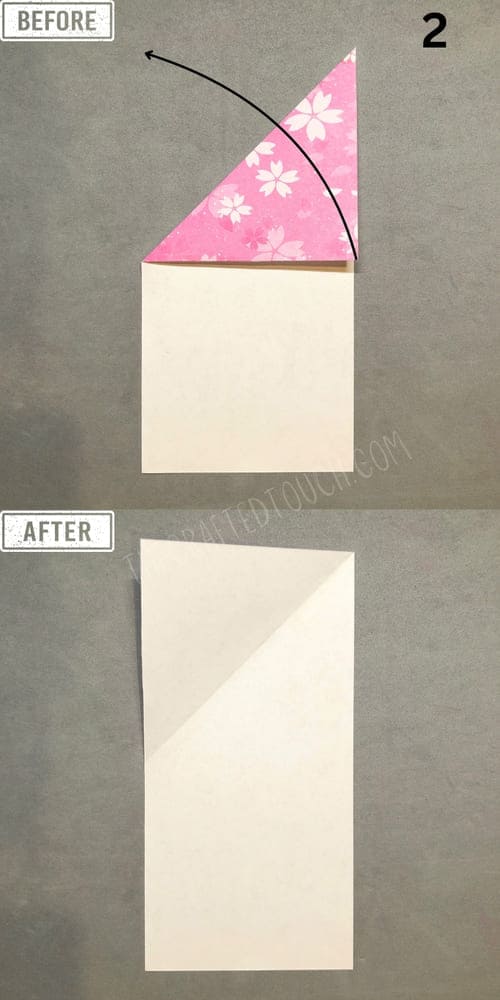
Unfold the crease you just made. You should now see a clear diagonal crease.
Step 3
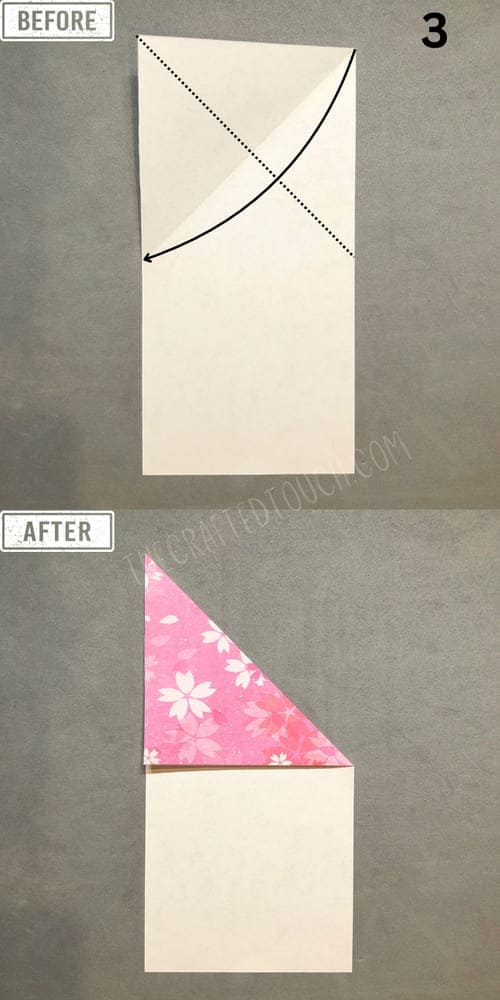
Fold the top left corner downward so that the top edge aligns with the right edge, creating a second diagonal crease that mirrors the first.
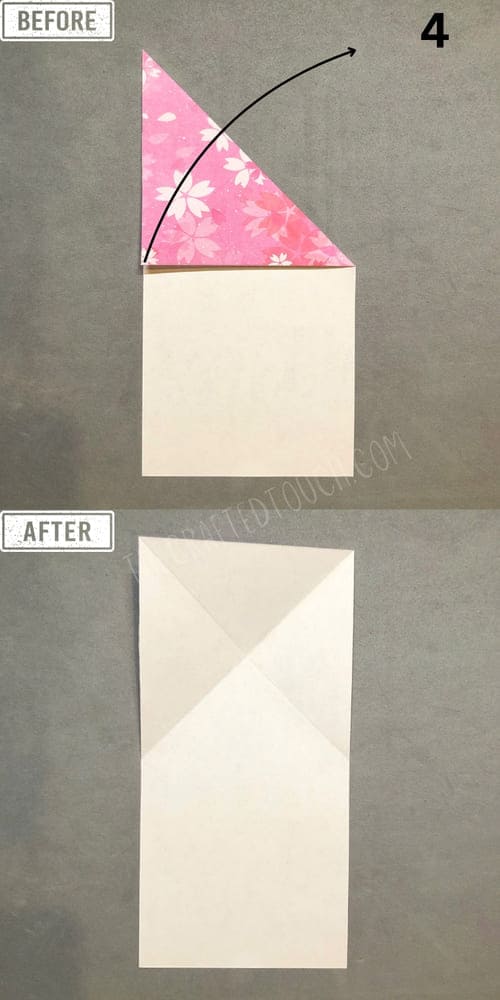
Step 4
Unfold the second crease. You should now see two diagonal creases intersecting in an X shape.
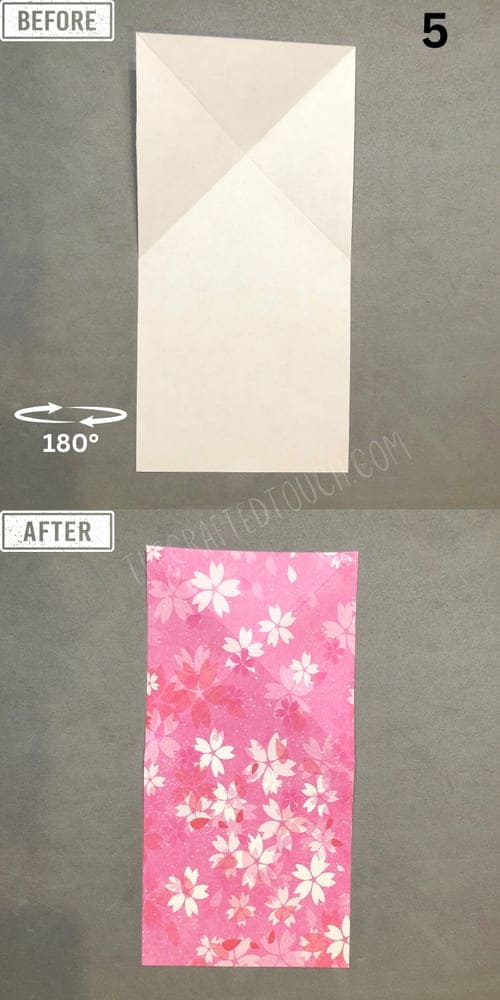
Step 5
Rotate the paper 180 degrees so the patterned side is facing up.
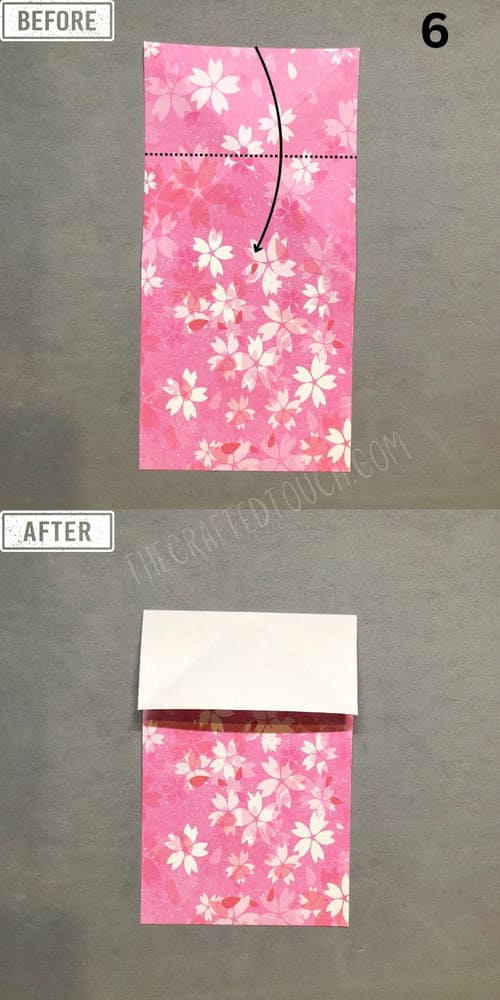
Step 6
Fold the top part of the paper (about 1/4 of the total height) downward along a horizontal line. Press firmly to create a clear crease.
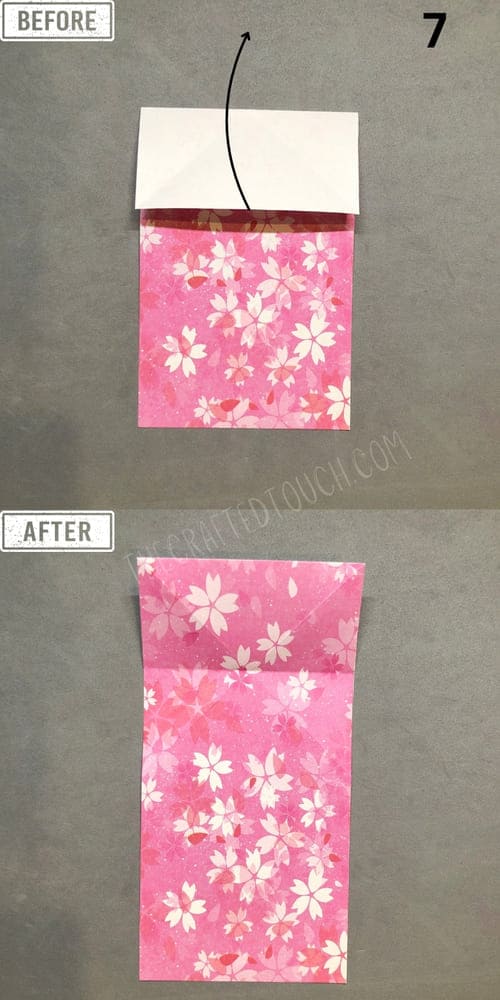
Step 7
Unfold the section you just folded, leaving the crease in place.
Step 8
Rotate the paper 180 degrees again so the white side is now facing up.
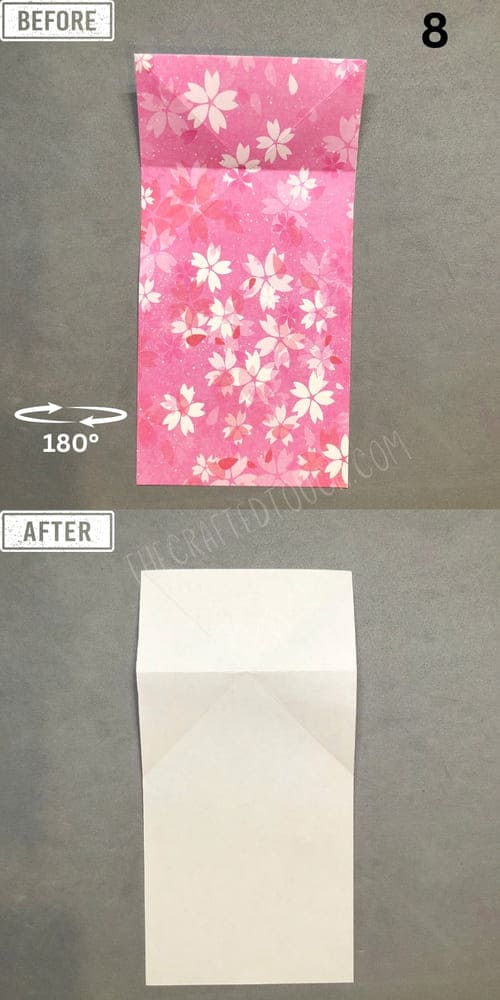
Step 9
Use both hands to gently press the edges of the paper inward at the point where the creases intersect.
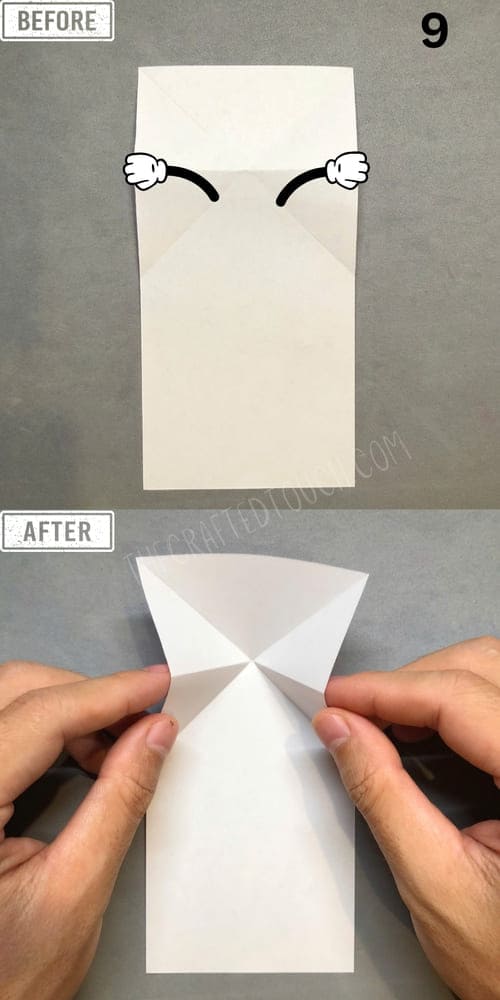
Step 10
Gently pinch both edges of the paper and push the top layer upward to form a parallel triangle.
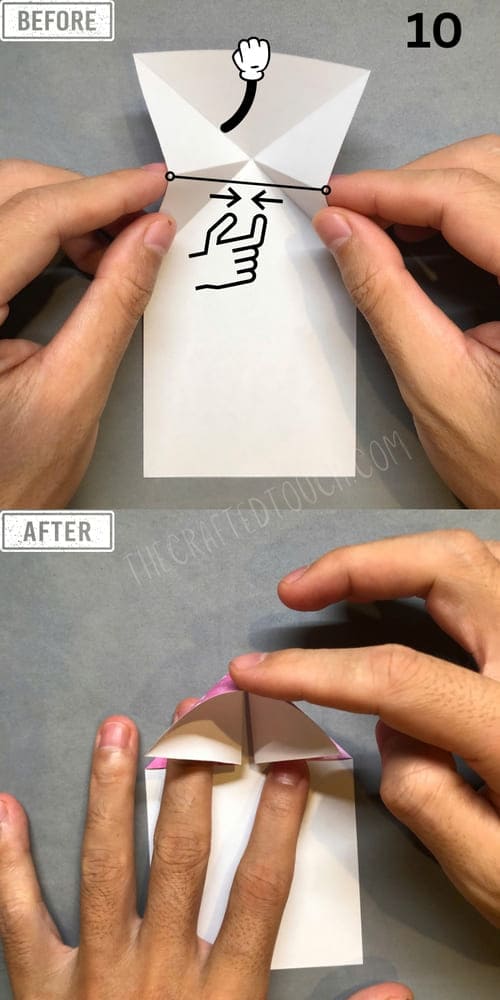
Step 11
Press down the tip of the triangle with your fingers to tighten the creases.
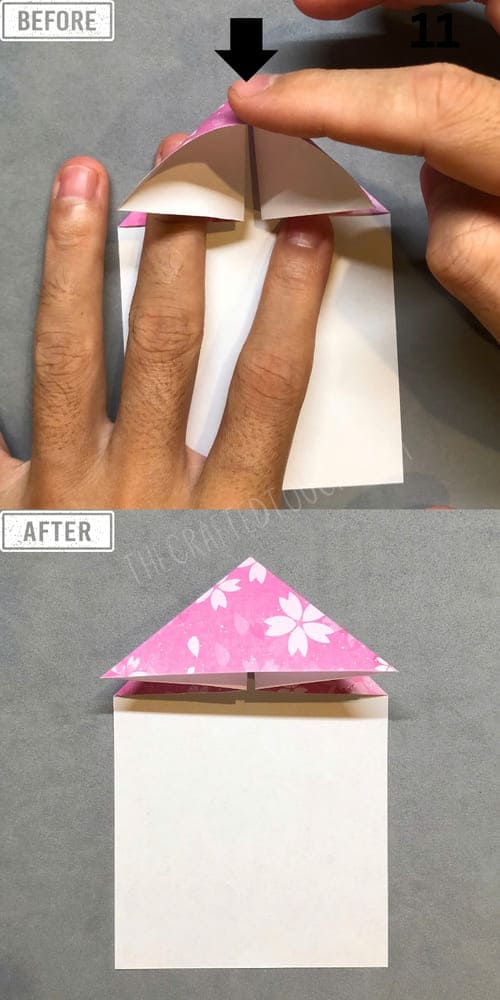
Step 12
Fold the top triangle downward along the horizontal crease.
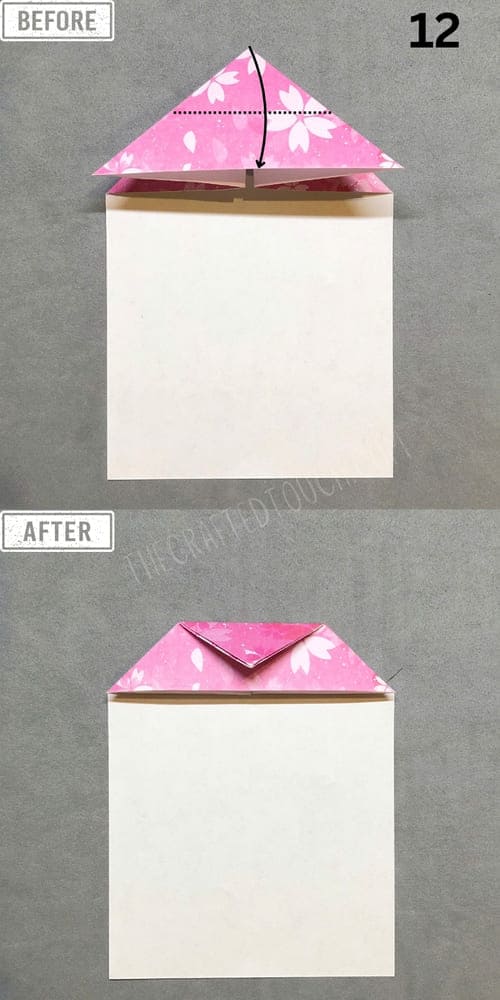
Step 13
Unfold the small triangle you just made to reveal the full crease lines.
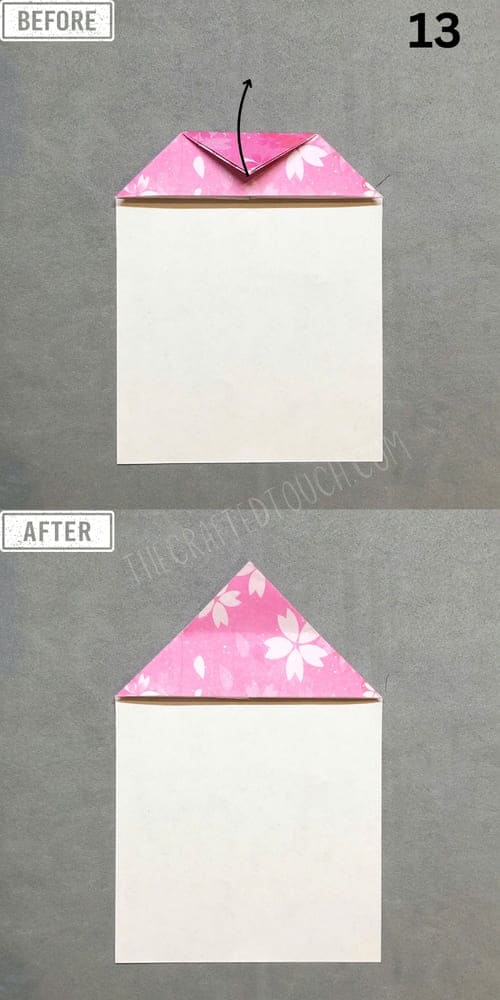
Step 14
Fold the top edge of the triangle downward along the curved dotted line, then gently press to create a soft crease.
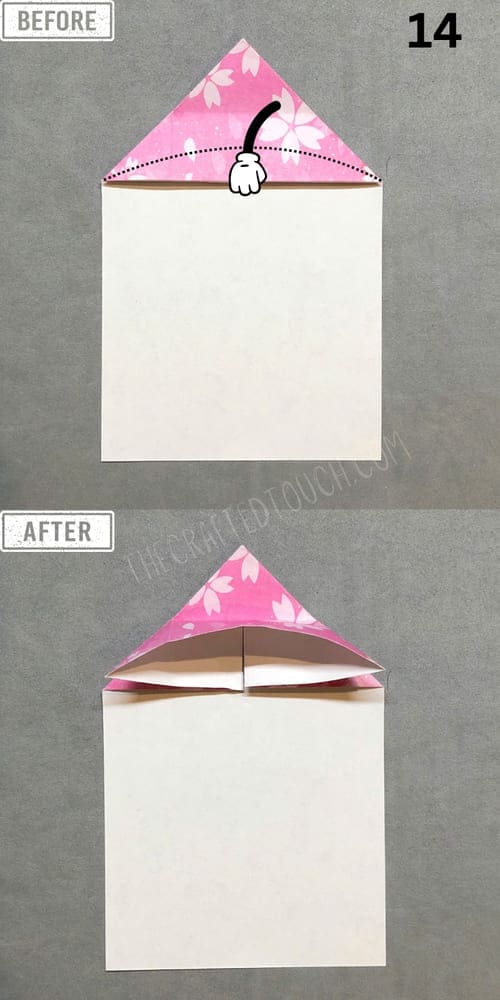
Step 15
Open the inner layer of paper along the existing creases and gently pull it upward, adjusting with your fingers to make the layer pop out into a raised fold.
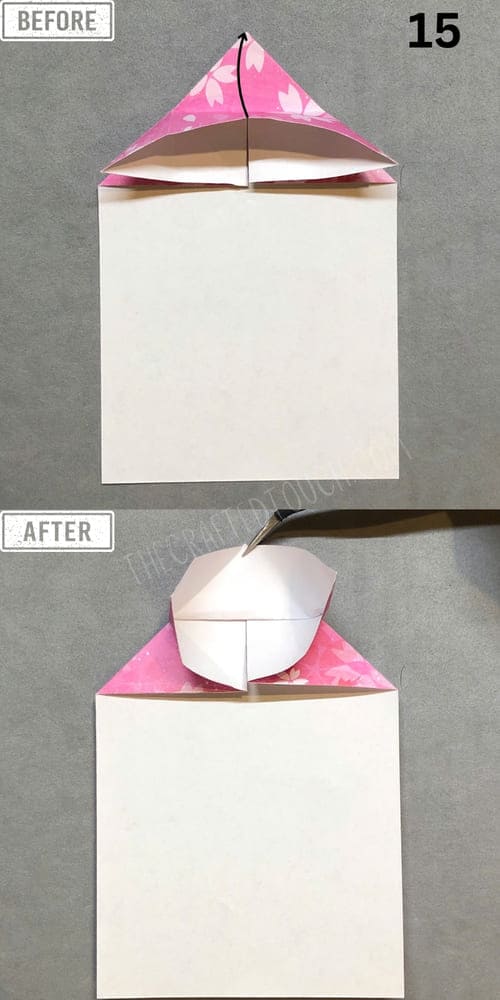
Step 16
Use tweezers to gently pull the exposed white paper upward and press along the curved crease to shape it neatly.
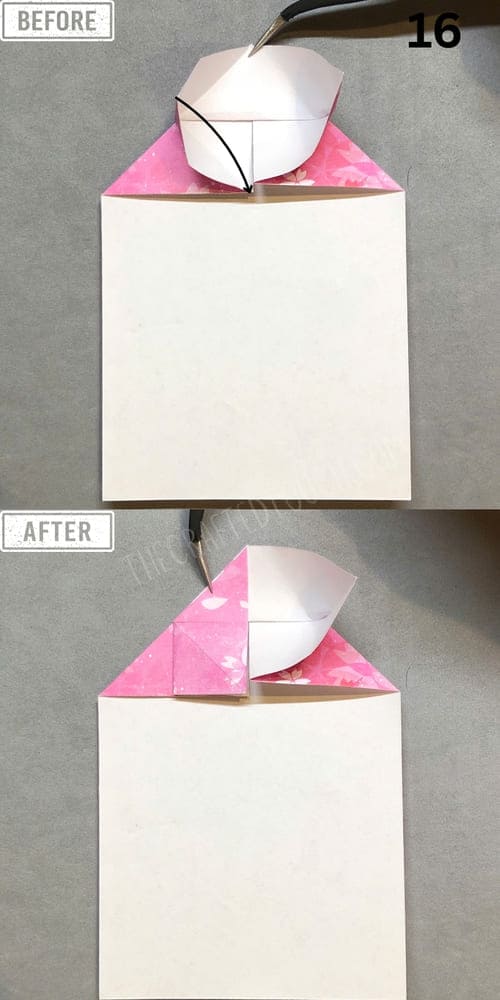
Step 17
Repeat the same technique on the adjacent fold, ensuring it aligns snugly.
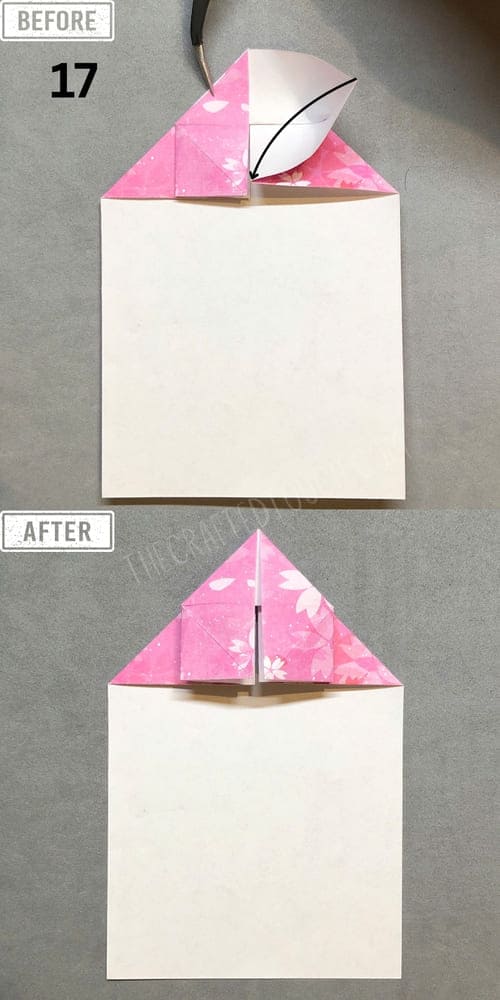
Step 18
Next, pull the folded layer from left to right. A triangle shape will appear.
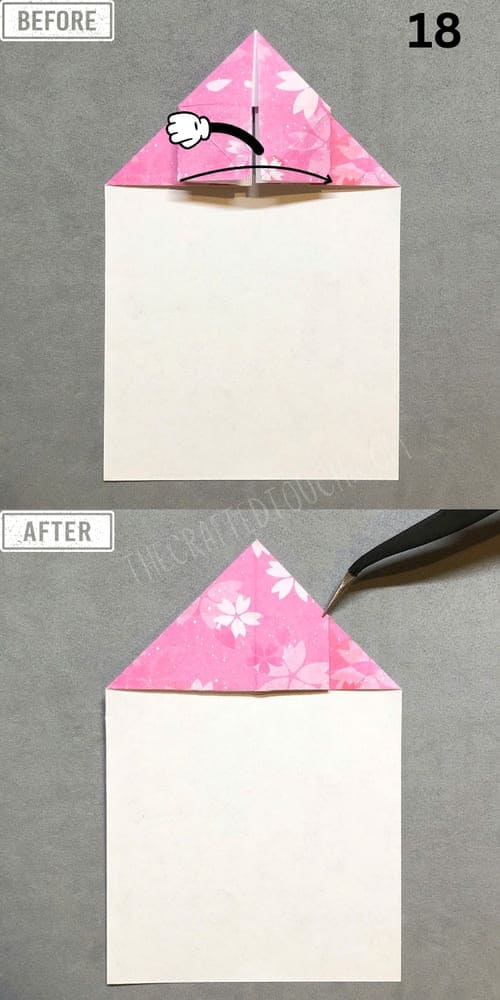
Step 19
Follow the dotted lines on the image to fold the rectangular edge from left to right, covering half of the sheet.
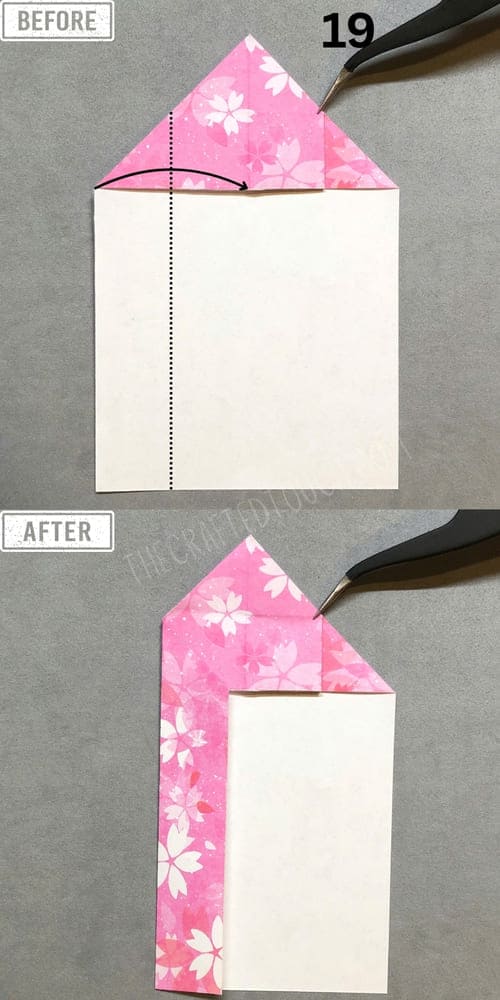
Step 20
Fold the triangle at the right corner toward the left along the diagonal dotted line shown in the diagram.
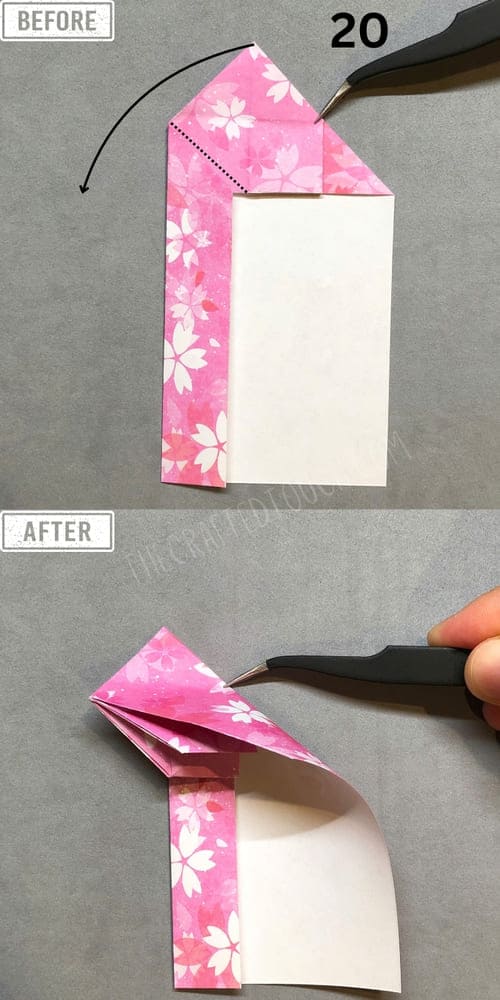
Step 21
After pressing the fold to form a crease, unfold the section you just folded.
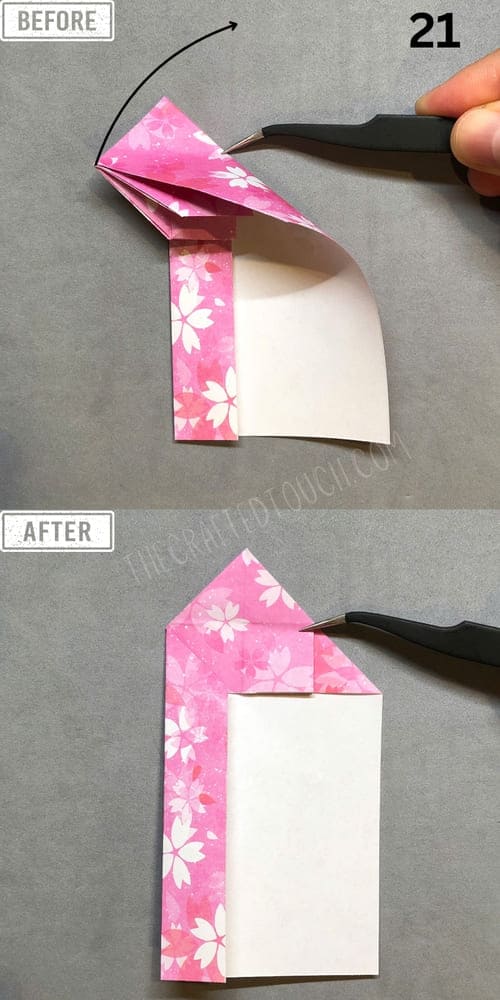
Step 22
Then pull out the small rectangular part folded in step 19.
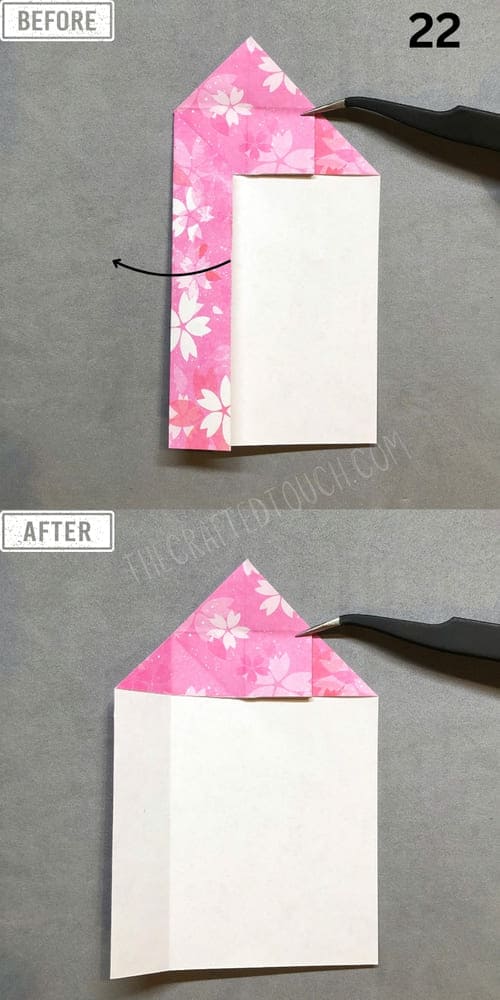
Step 23
Gently lift the paper in the direction of the arrow and fold it inward to create a new shape.
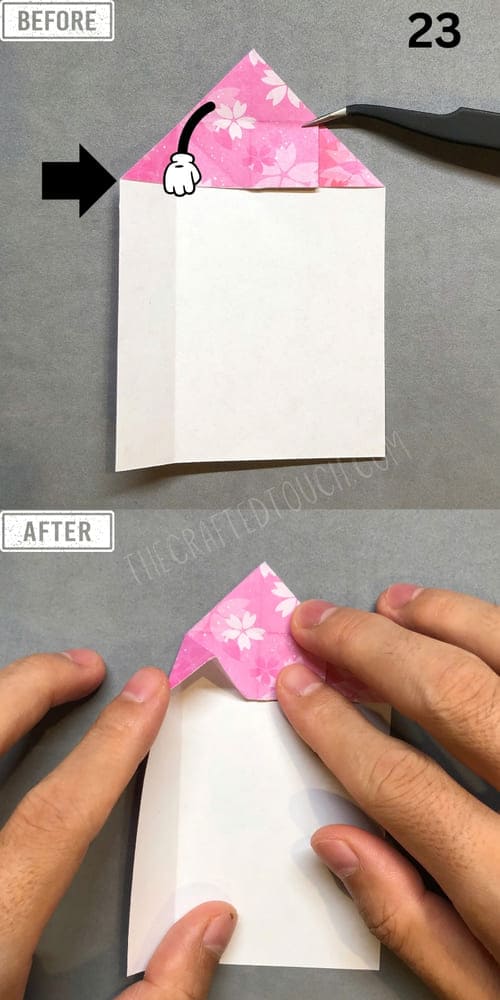
Step 24
Carefully pull the small triangle in the middle to the left so that the folded section forms a neat corner, aligned with the left edge of the paper frame.
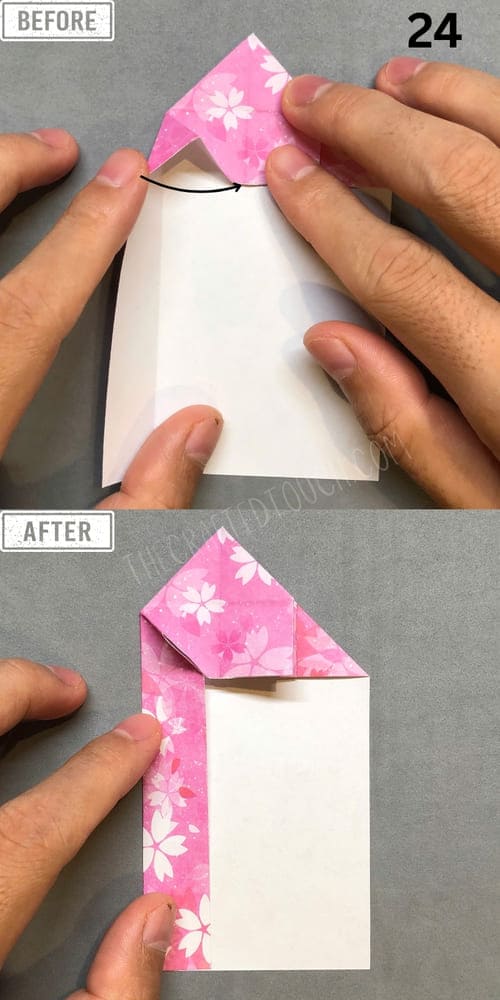
Step 25
Fold the paper at the left corner inward, following the arrow, and press firmly along the edge to secure the crease and prevent it from unfolding.
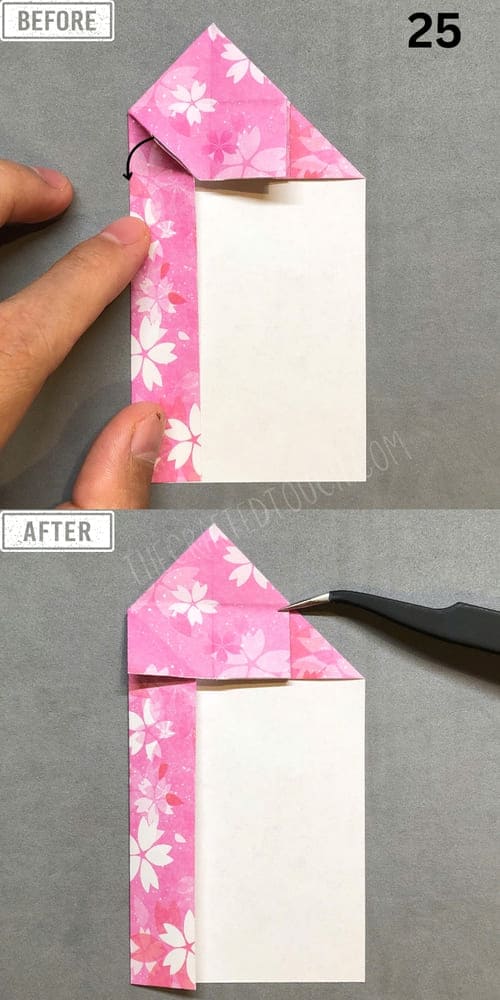
Step 26
Use tweezers to gently open the small triangle and pull the paper downward along the curved line to create a new fold.
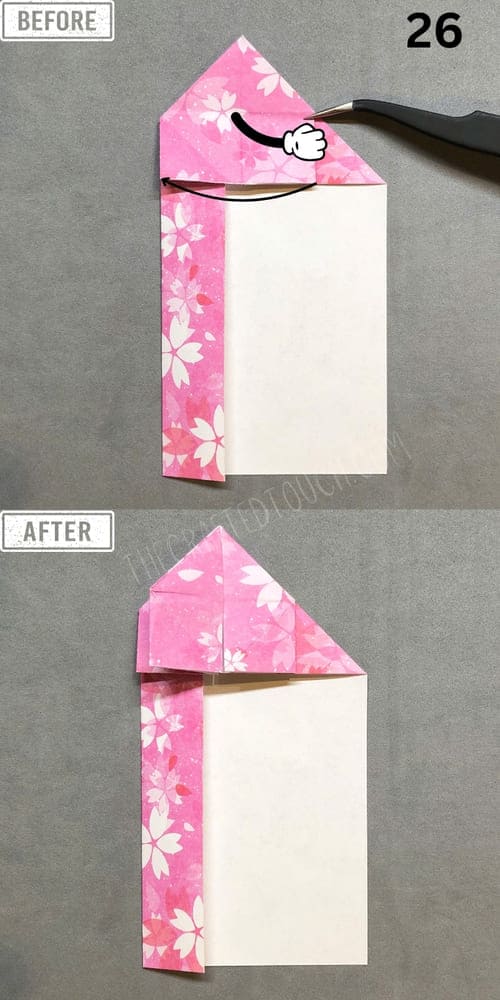
Step 27
Gently lift the small triangle at the top along the curved fold shown in the diagram.
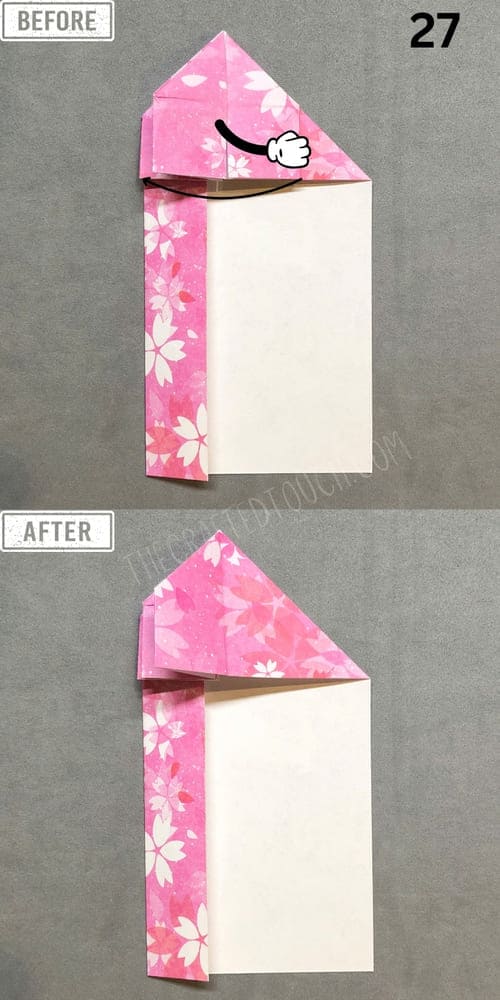
Step 28
Fold the right flap inward along the dashed line to form a shape parallel to the center.
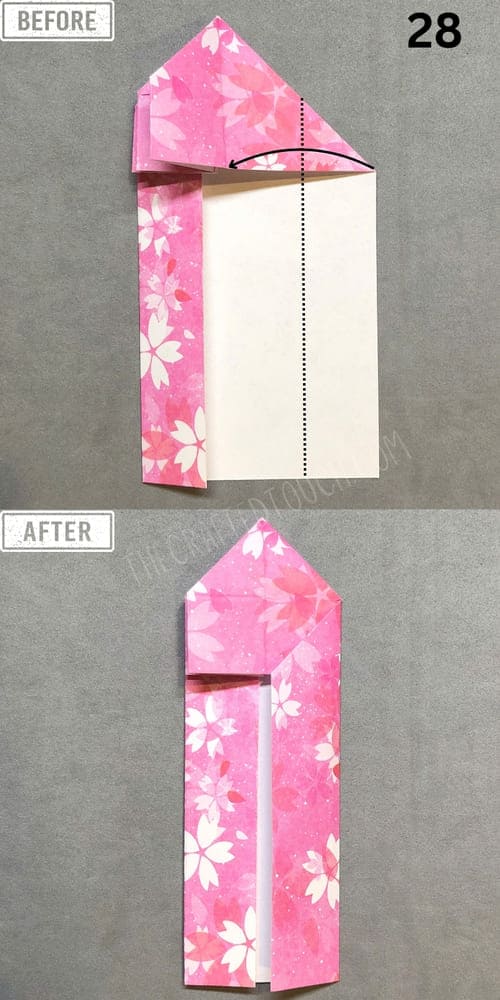
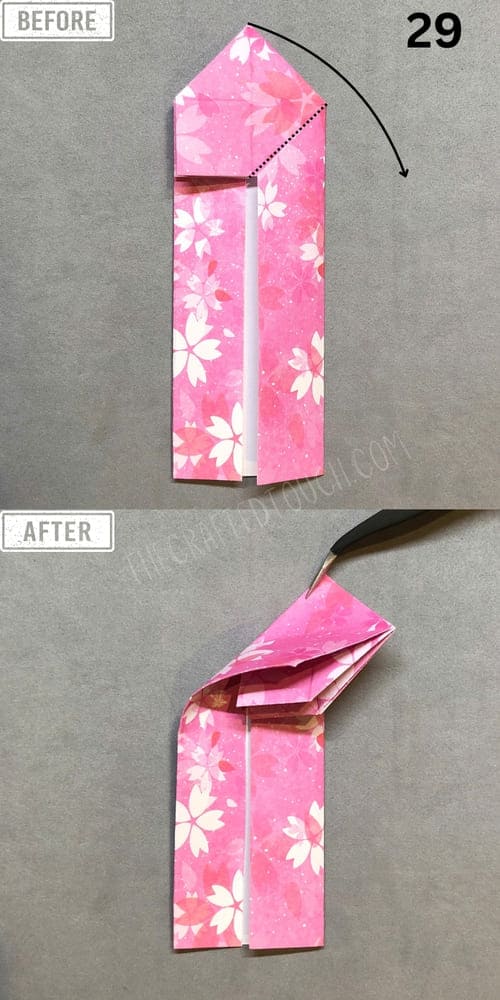
Step 29
Fold the upper right corner downward along the diagonal line indicated in the diagram. Use tweezers to pull the paper corner outward to reveal the inner fold.
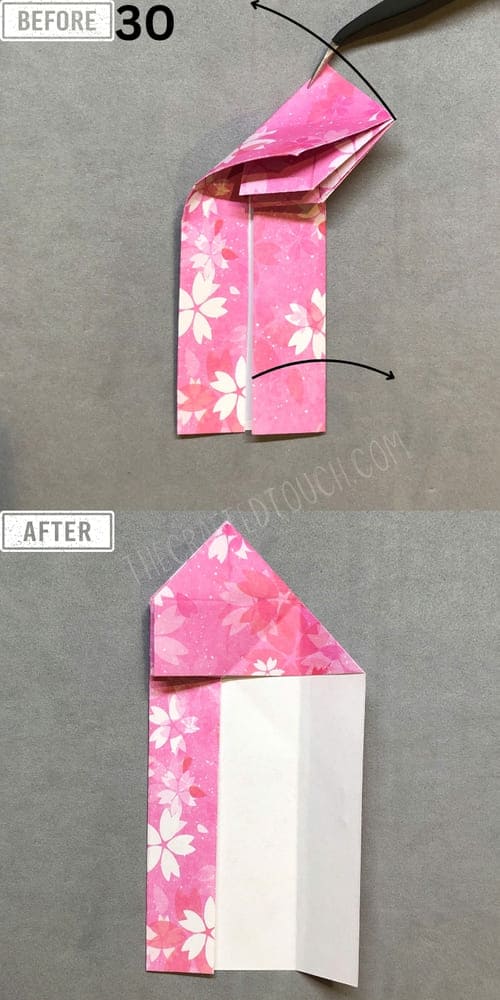
Step 30
Fold the top triangle corner downward following the arrow, then pull the right edge outward.
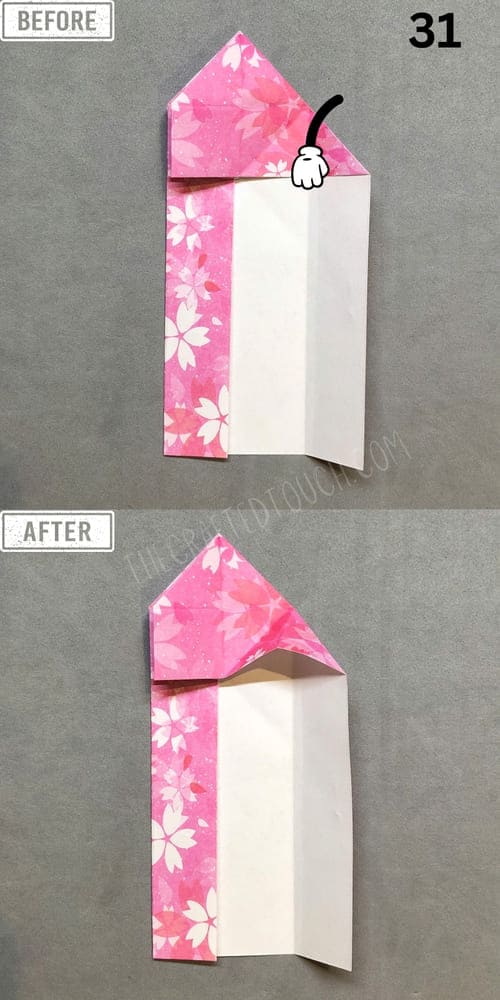
Step 31
Following the hand direction in the image, gently pull the paper edge outward.
Step 32
Fold the right triangle flap inward in the direction of the black arrow, as you did with the left side in Step 24.
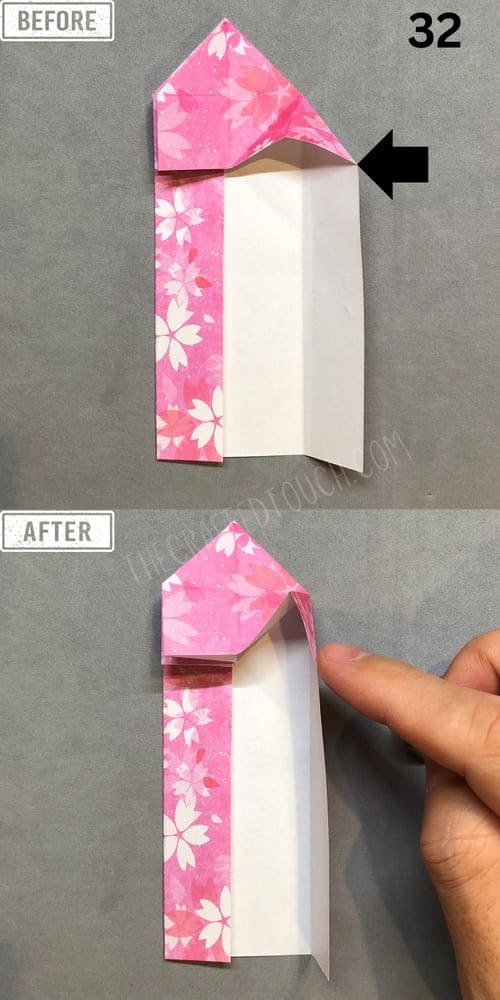
Step 33
Fold the left triangle flap inward following the curved arrow in the diagram.
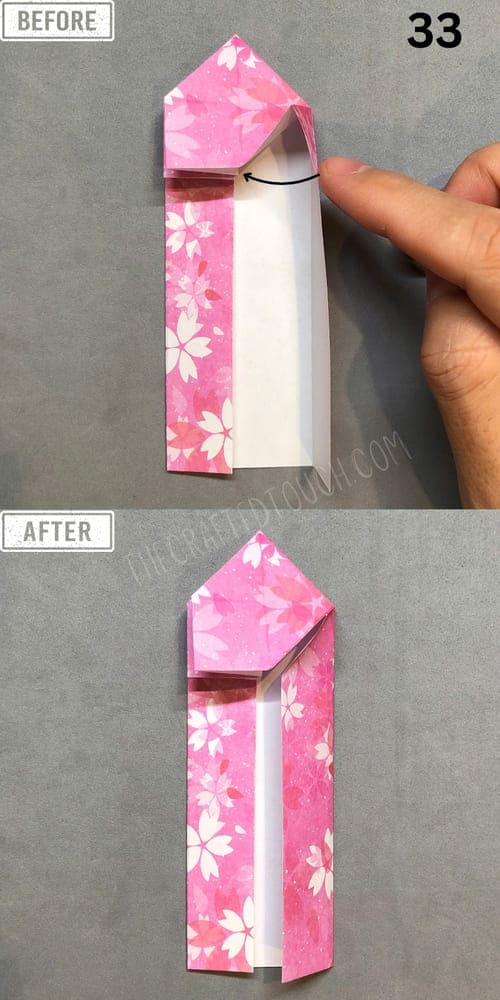
Step 34
Fold the upper right corner inward along the direction of the arrow to form two symmetrical wings, hugging the body closely.
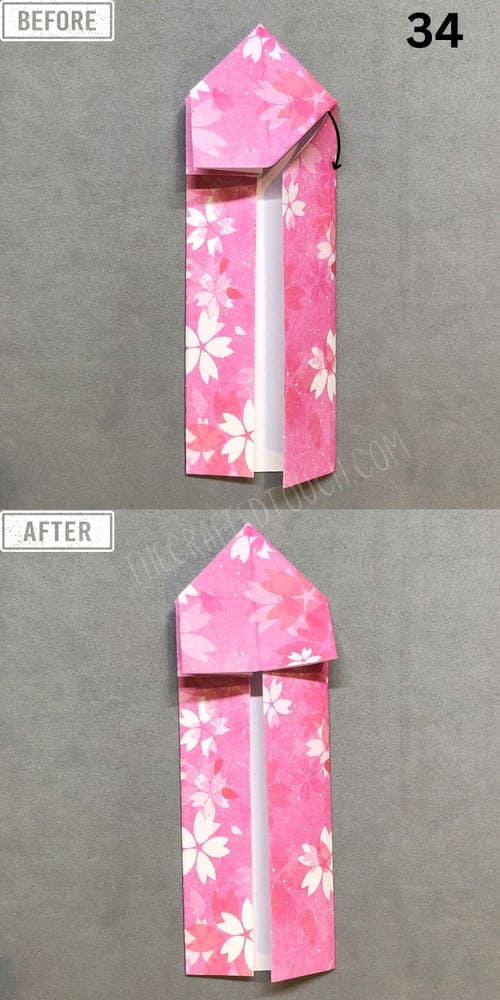
Step 35
Gently open the small triangle following the arrow, then press it down firmly
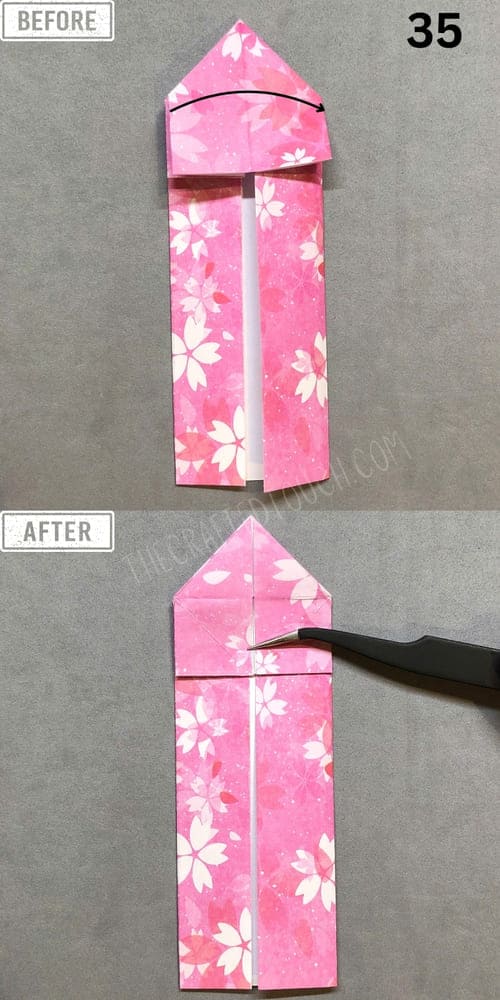
Step 36
Rotate the entire paper 180 degrees.
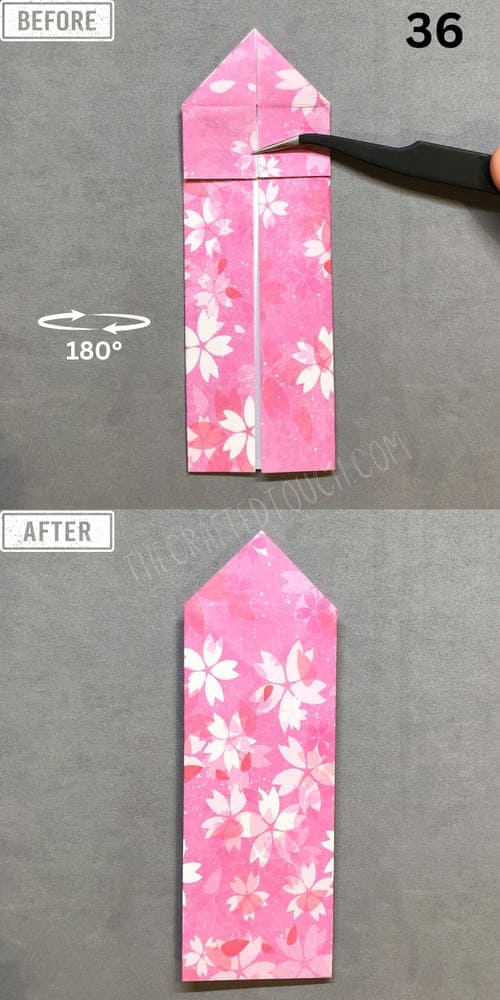
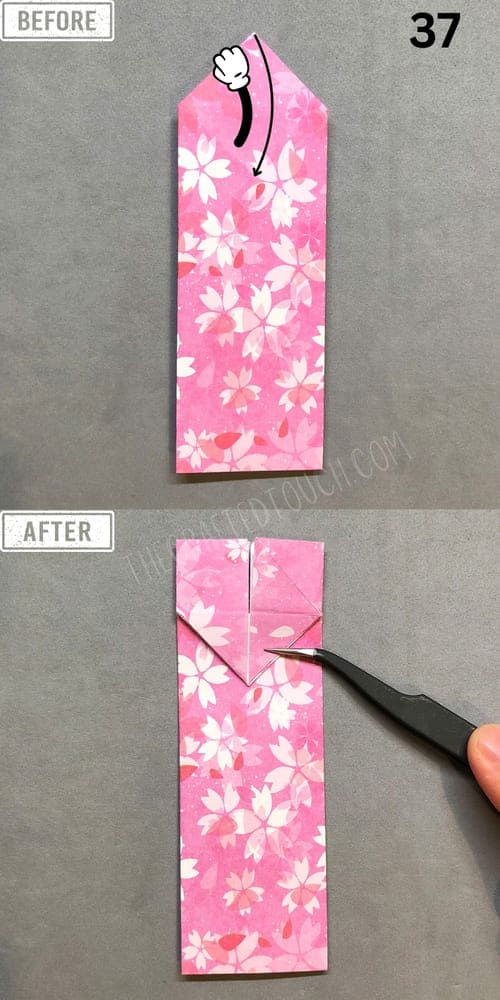
Step 37
Fold the pointed tip downward. You will see a small triangle and two squares appear above it.
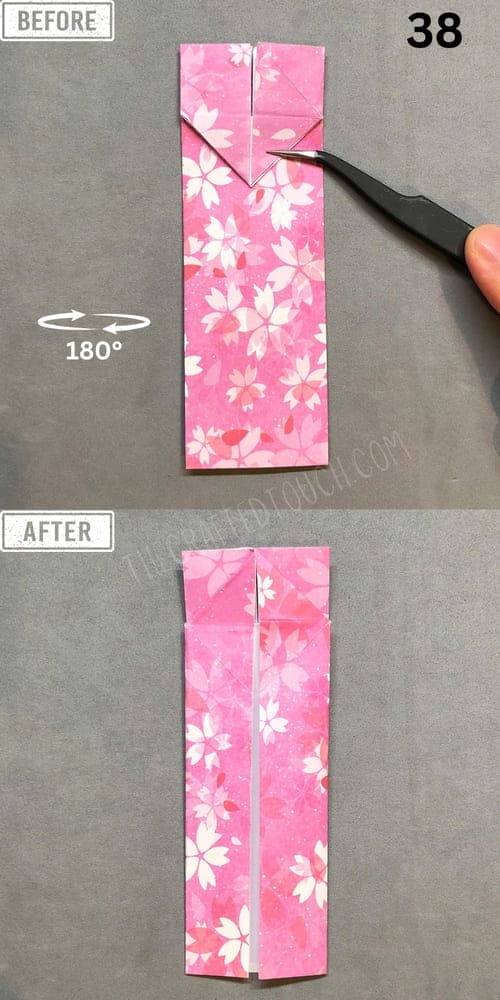
Step 38
Rotate the entire shape 180 degrees to flip to the other side.
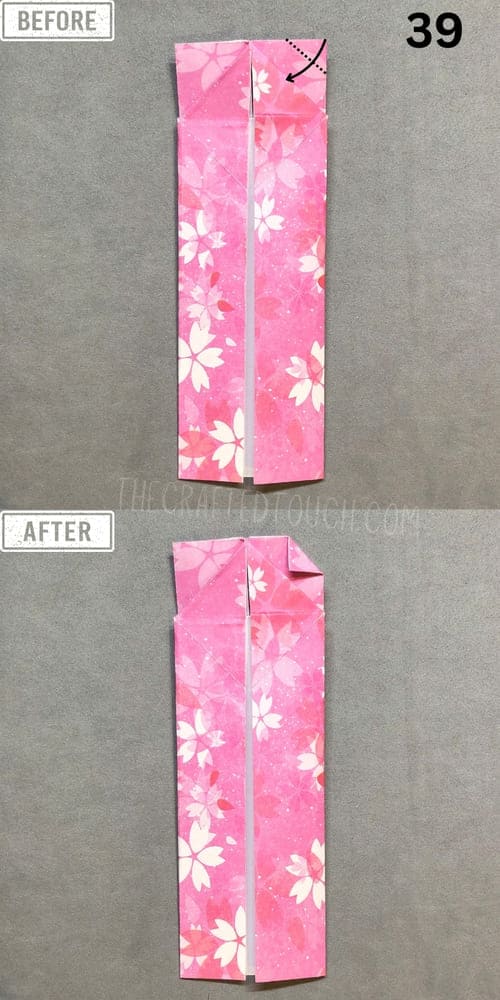
Step 39
Fold the top right corner diagonally, as shown in the illustration, to create a neat small triangle crease.
Step 40
Fold the small top right triangle outward along the diagonal line shown in the image to form a raised triangle.
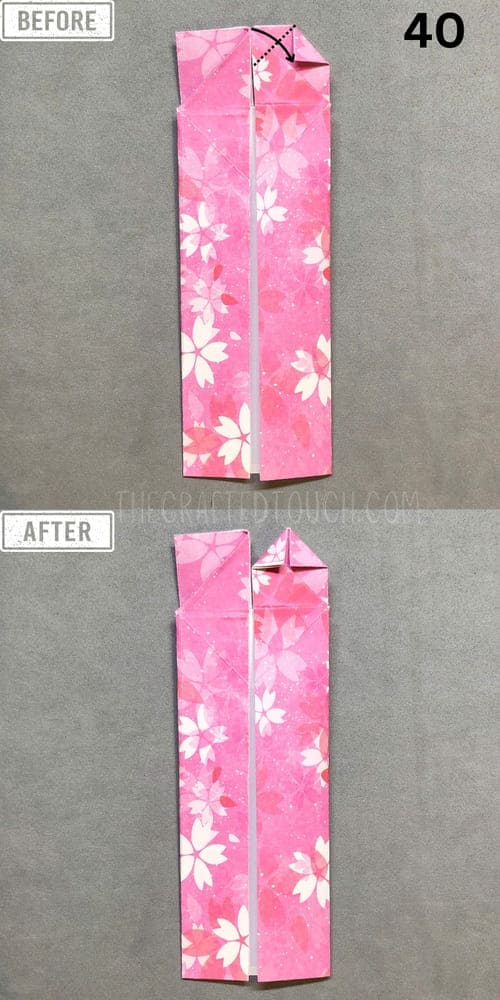
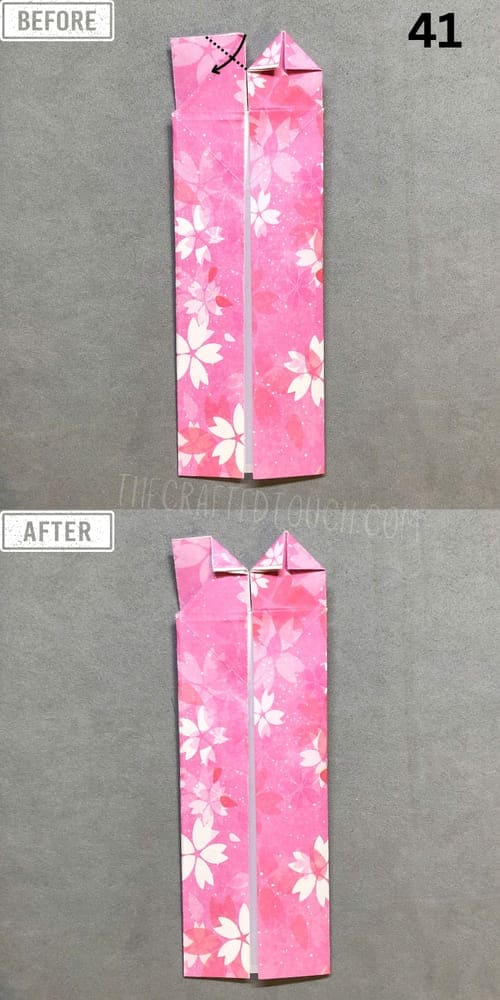
Step 41
Following the marked arrow, repeat the same fold as in Step 39.
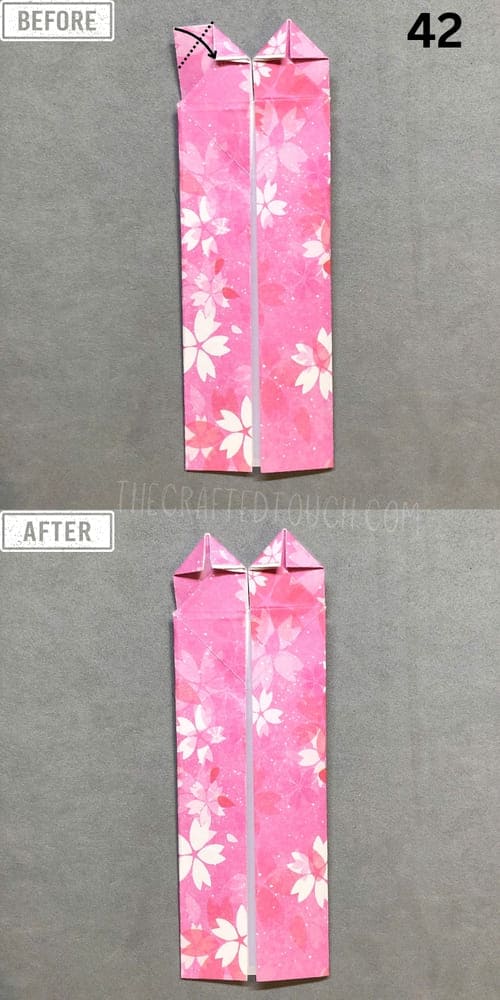
Step 42
Continue folding the small right corner to ensure symmetry on both sides, forming the top peak of the heart.
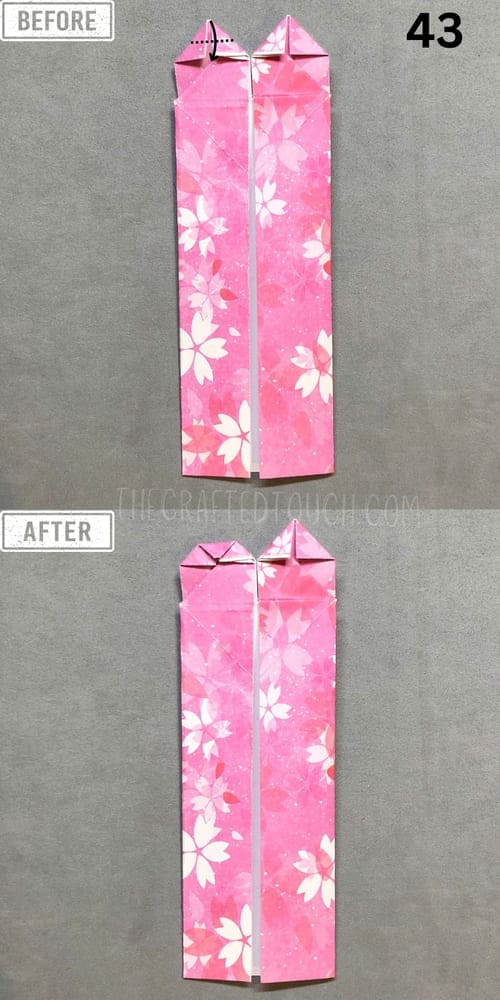
Step 43
Fold the small upper left flap inward along the dotted line.
Step 44
Fold the top right corner diagonally to create a small crease.
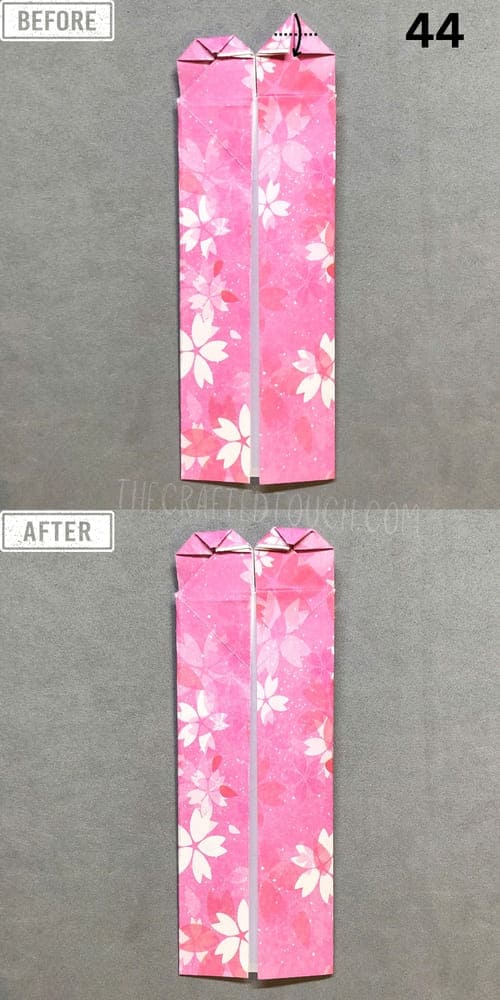
Step 45
Divide the small rectangle in the right corner in half along the indicated line, then fold it from right to left.
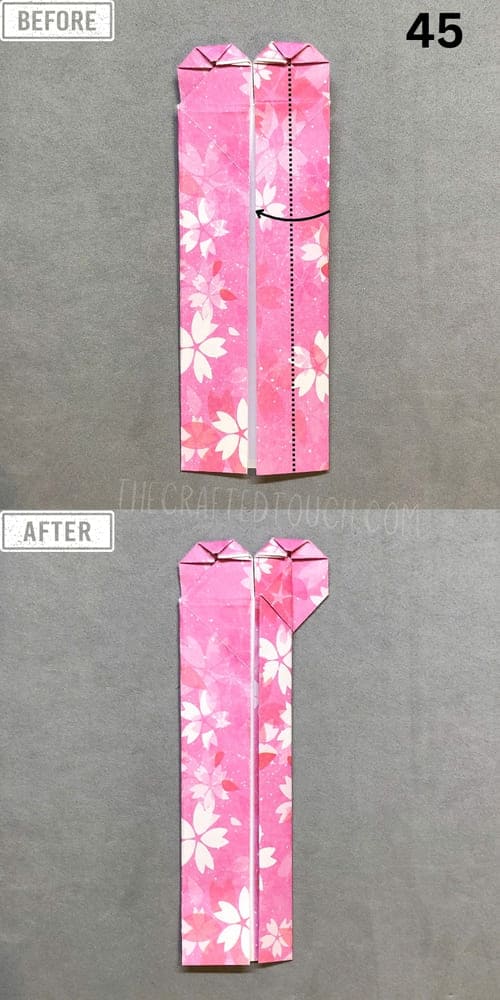
Step 46
Repeat the same fold on the rectangle on the right, as in Step 45.
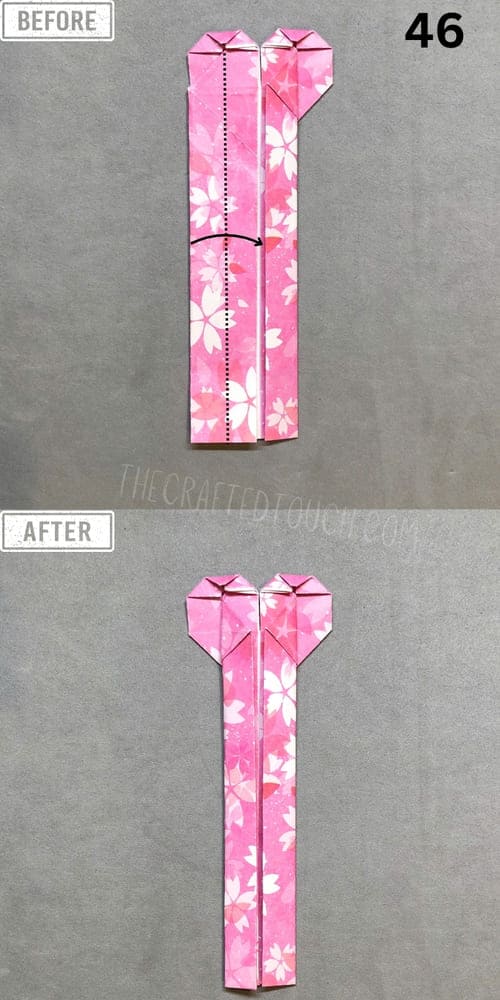
Step 47
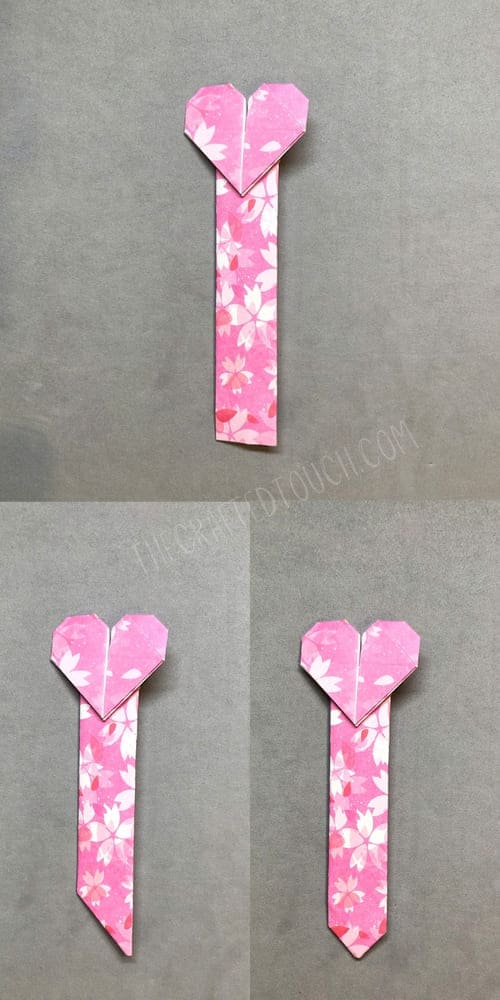
Rotate the shape 180 degrees again, and now you’ll see your finished bookmark.
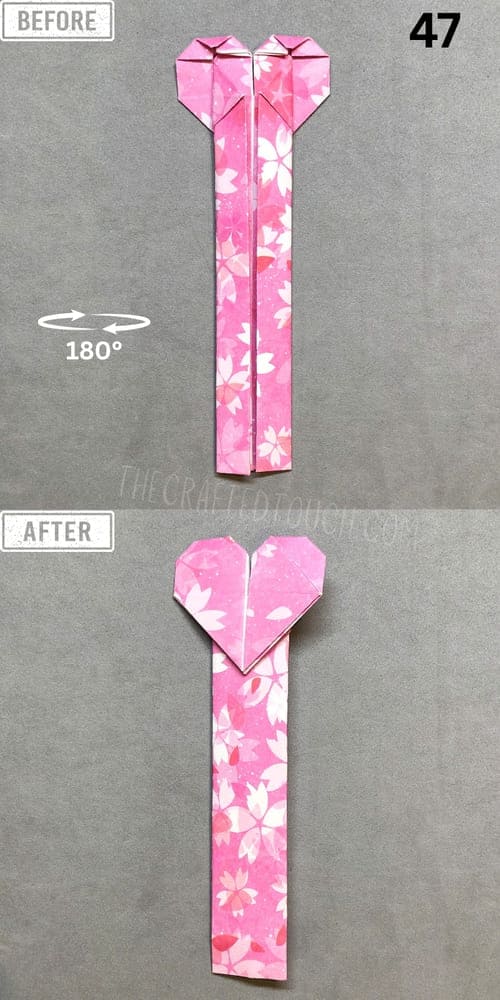
Step 48
This is the final result of my heart-shaped origami bookmark!
| Tip | Description |
| Sharp folds | Use your fingernail or the edge of a ruler to press down and sharpen the creases. |
| Follow each step carefully | Take it one step at a time, rushing may lead to misaligned folds. |
| Practice several times | Try folding with scrap paper a few times to master the technique before using your nice paper. |
| Get creative | Add a small message on the heart or decorate it with stickers. |
Conclusion
This bookmark isn’t just practical for reading I also find it easy to make and super cute! It’s perfect as a small gift for friends, students, or simply as a personal creative project. I hope you have as much fun folding it as I did, and don’t hesitate to share photos of your final creation I’d love to see it!
