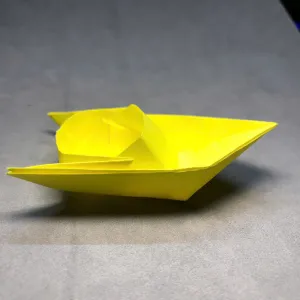
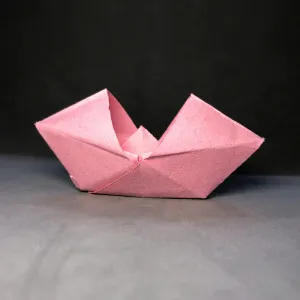
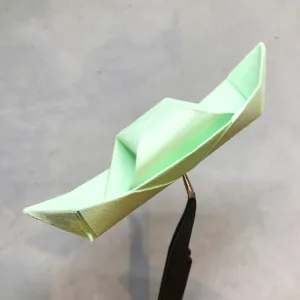
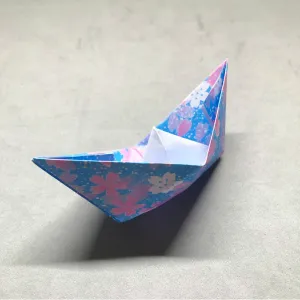
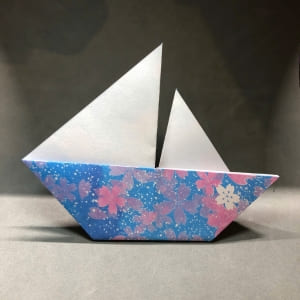
Do you like making things with paper? Today, we’re going to fold a paper boat together. It’s a fun little craft that doesn’t need glue, tape, or anything fancy. You just need a rectangle piece of paper and a flat space to work on. This boat can be part of your toy collection or something nice to decorate your desk. Take your time, follow each fold, and soon you’ll have a boat that’s ready to set sail in your imagination
Materials & Preparation
| Material | How I Use It |
| Rectangular paper | I use one piece of paper shaped like a rectangle (longer on one side). It can be plain, colorful, or even have fun patterns. Thinner paper is easier to fold. |
| Scissors (optional) | If my paper isn’t a rectangle or i only have square or big paper, I ask an adult to help me cut it to the right shape. I’m always careful with scissors. |
| Ruler or fingernail | I use a ruler or my fingernail to press along the folds. This makes the boat hold its shape and look neater. |
| Flat table or desk | I fold my paper on a clean, flat surface like a table or desk. This makes it easier to follow the steps and keep the paper steady. |
| A little patience | I take my time and don’t rush. If I make a small mistake, I try again. Being patient helps me enjoy the process more. |
| Extra paper (optional) | I keep some extra paper nearby in case I want to practice or make more than one boat to float, decorate, or share with friends. |
Step by step instructions
Before we begin making our paper boat, let’s get ready. Make sure you have a piece of rectangle shaped paper and a clean table to fold on. You don’t need anything else, just your hands and a little bit of patience. If this is your first time, don’t worry. Just follow along slowly, and you’ll have a cool boat in no time.
Ready? Let’s go!
Step 1
To start folding the boat origami tutorial, I place the rectangle shaped paper vertically on the table. Then I fold the top right corner down at an angle to make a big triangle at the top.

Step 2
Now I fold the top left corner down at an angle to make a smaller triangle on top

Step 3
Then I fold the rectangle at the bottom up, using the edge of the triangle as a guide.

Step 4
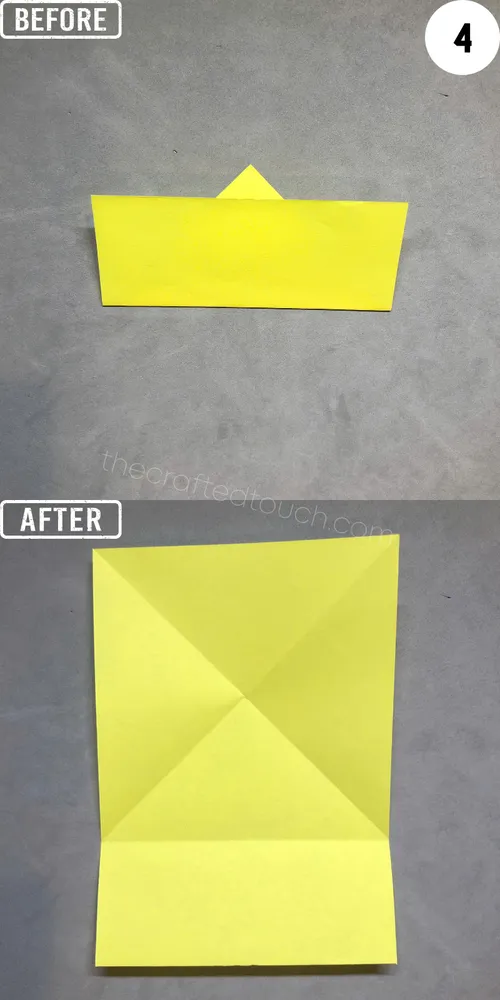
After making a nice fold, I open the paper back to its original shape.
Step 5
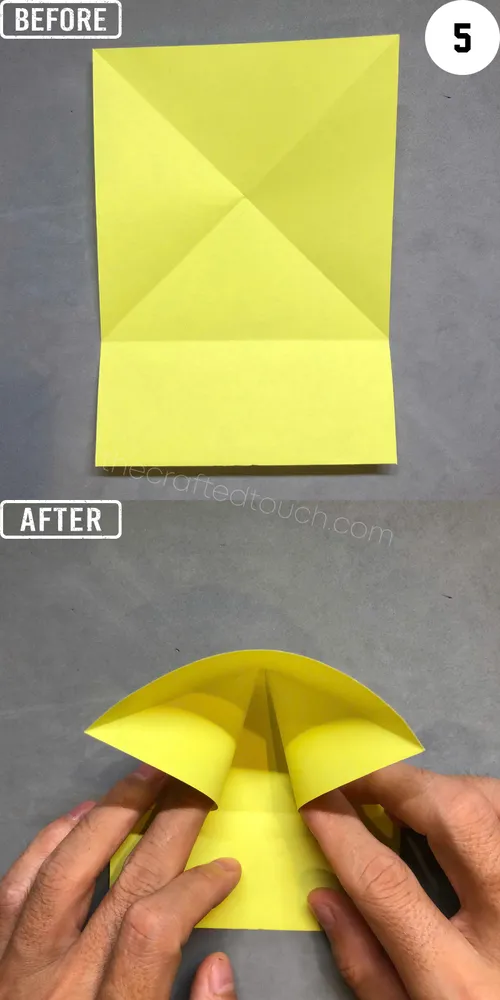
With the top part of the paper, I use both hands to gently bring the two edges closer together, following the X-shaped creases I made earlier.
Step 6
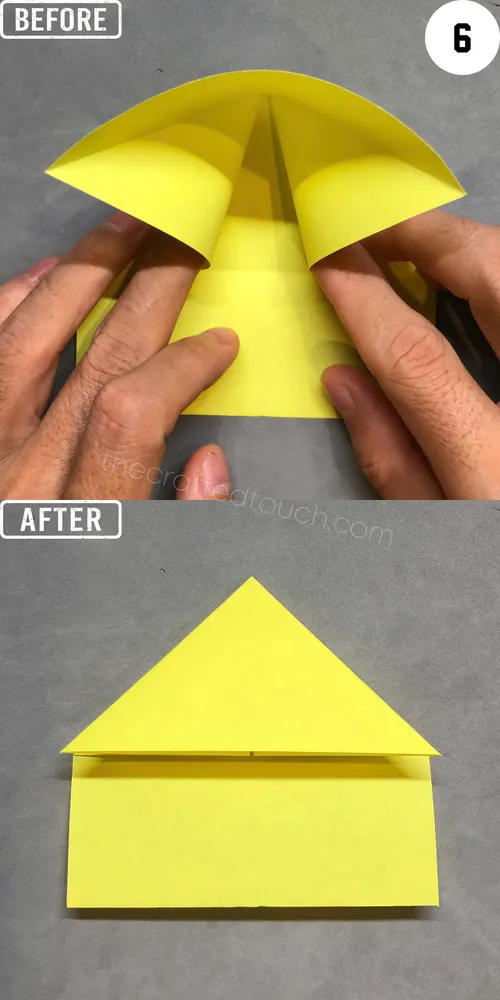
At the same time, I press the top edge of the paper down to form a triangle at the top.
Step 7
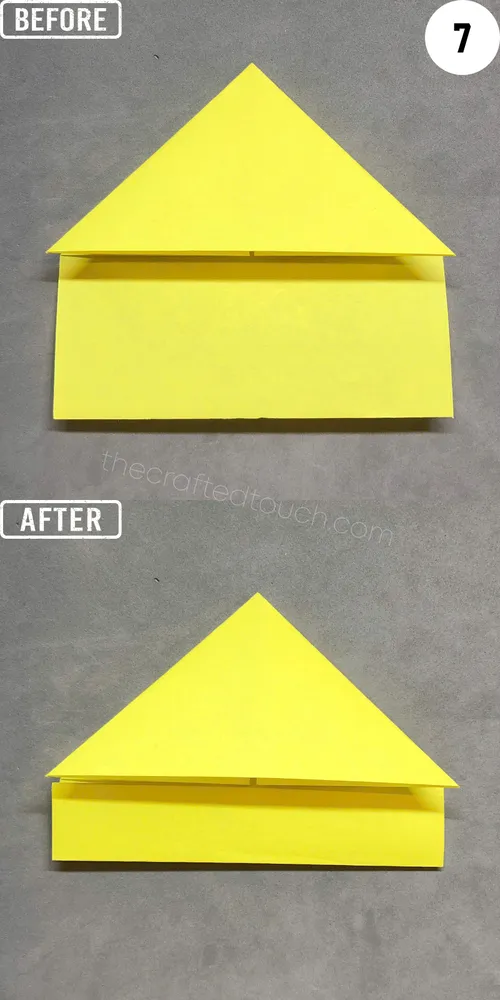
With the rectangle at the bottom, I fold it in half so that the bottom edge touches the edge of the triangle above it.
Step 8
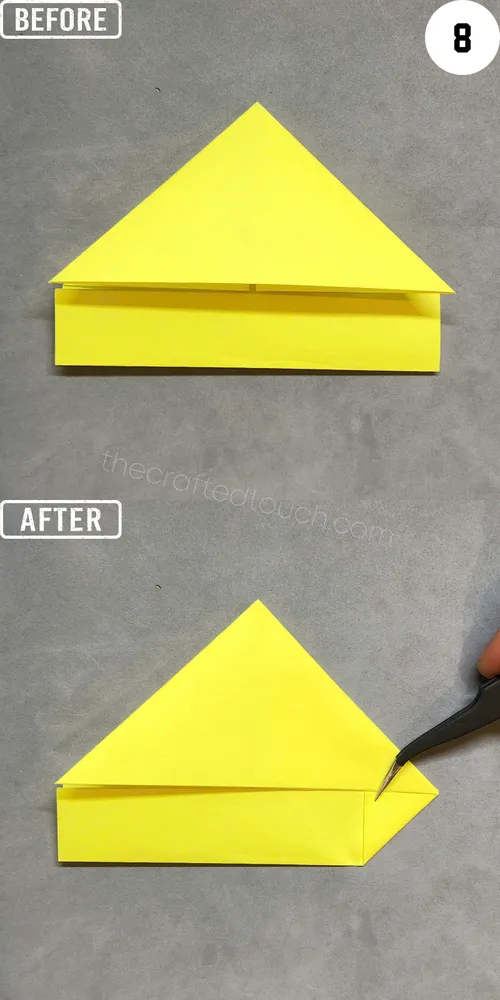
Then I fold the bottom right corner up at an angle to make a small triangle.
Step 9
I do the same on the left side, folding the bottom left corner up at an angle to make the second small triangle. Now the paper looks like an upside-down diamond shape.

Step 10
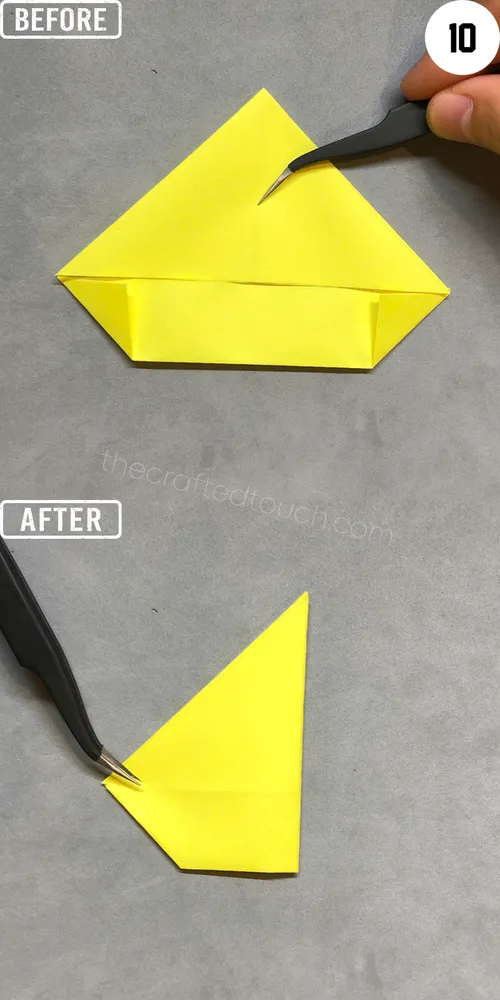
Now I will fold the upside-down diamond shape in half from right to left.
Step 11
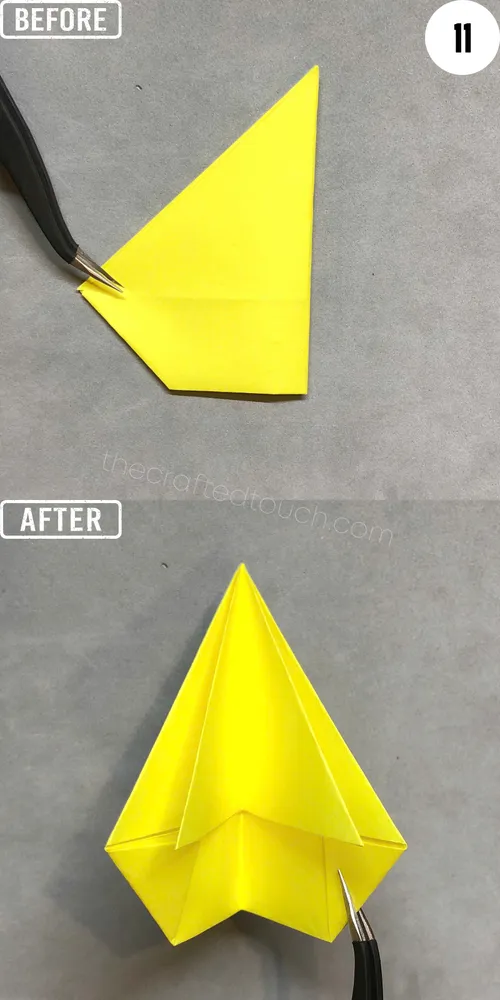
Then I stand it up and gently open the paper a little.
Step 12
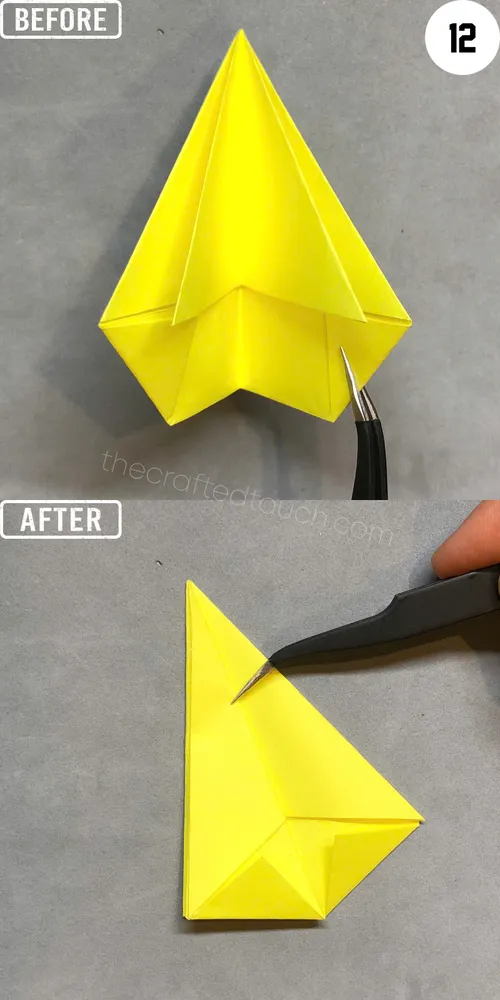
I place the front side of the paper face down on the table. Then, I fold the left side of the back of the paper diagonally toward the left, just like in the picture.
Step 13
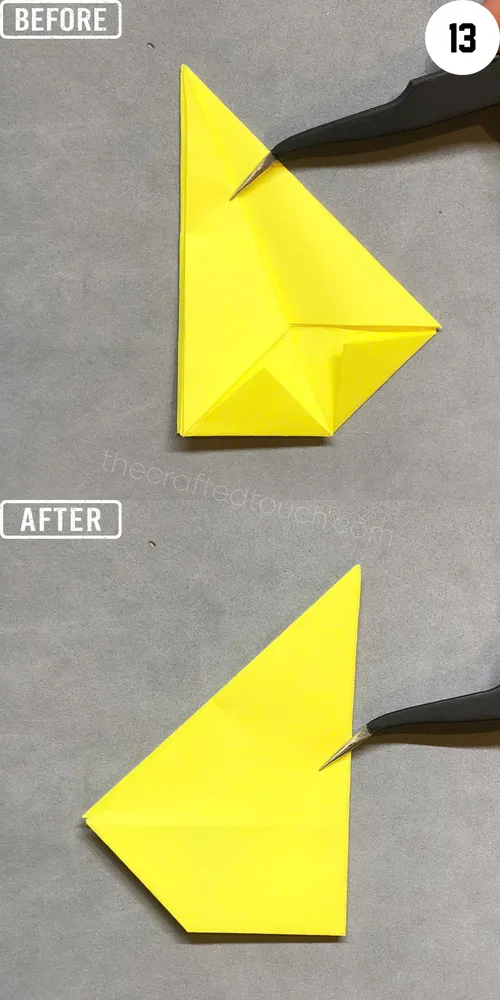
Now I turn the paper over to get ready for the next step.
Step 14
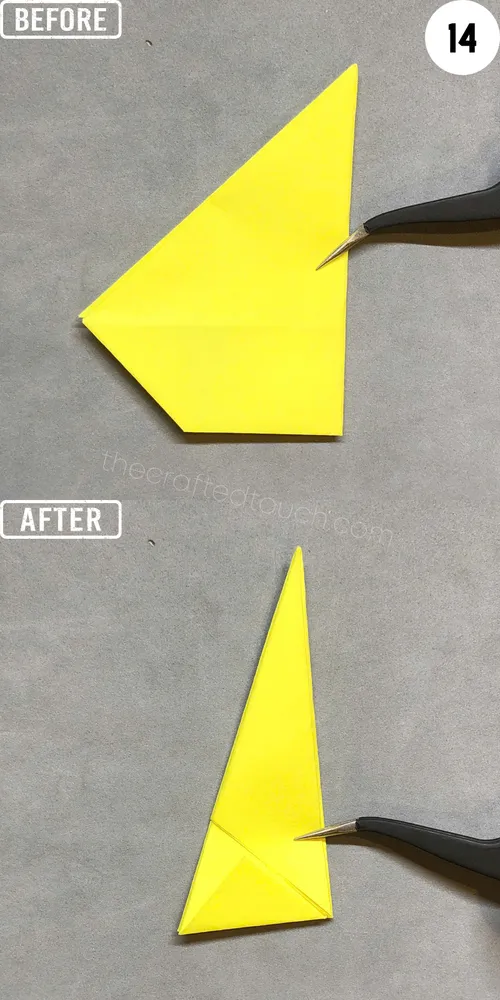
And I fold the paper diagonally again, but this time from left to right, to make a long triangle shape.
Step 15
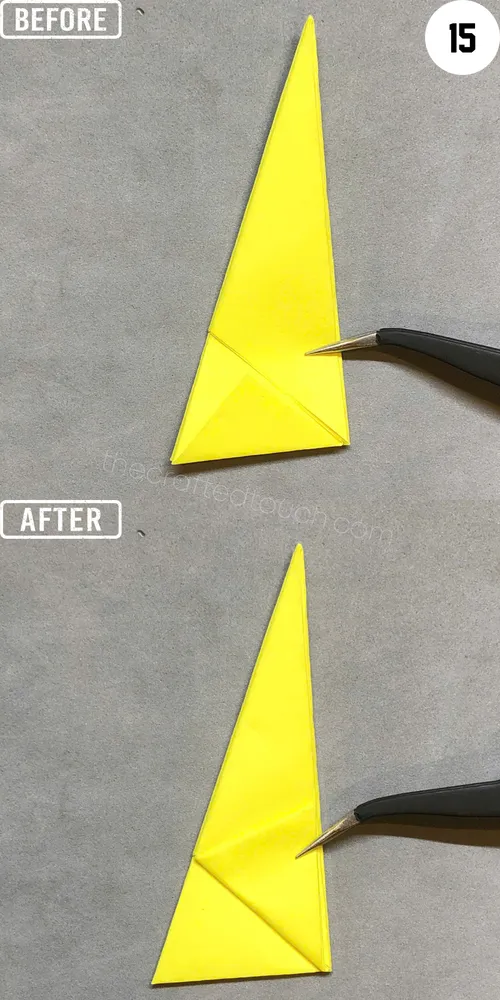
With the small triangle at the bottom left corner, I fold and flip it upward along the edge of the big triangle above it.
Step 16
Then I flip the paper over to get ready for the next step.

Step 17
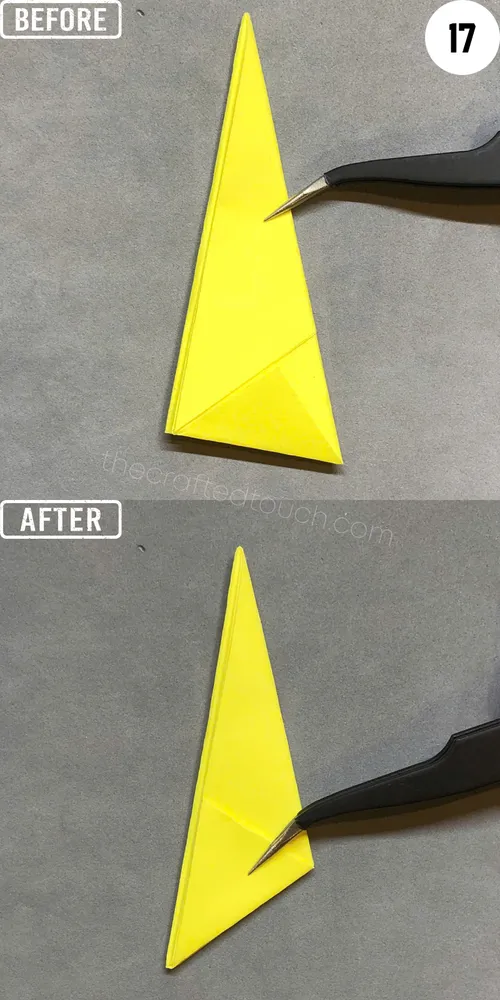
And I keep going by folding the small triangle at the bottom right up along the edge of the big triangle above it.
Step 18
Then I pull the bottom part of the paper out to the left. Now the paper looks like a diamond shape.
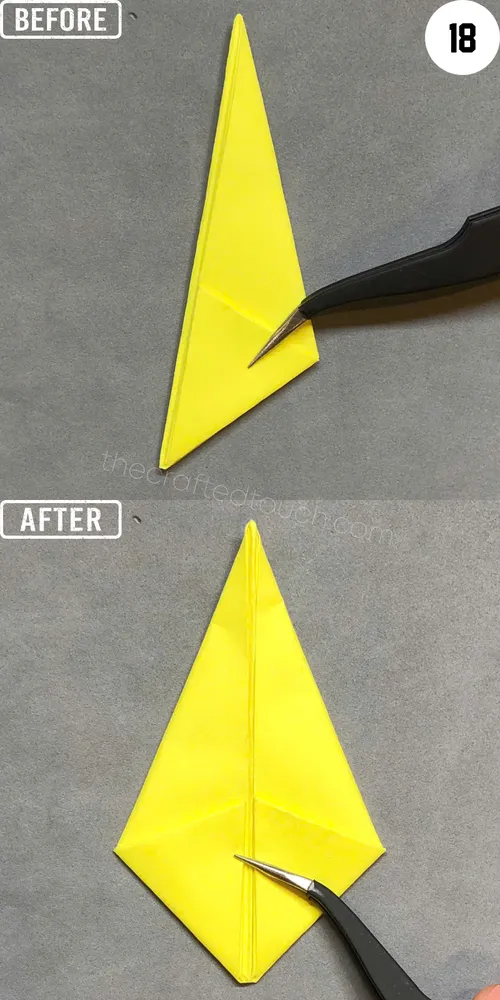
Step 19
Now I will fold the right corner of the diamond inward.
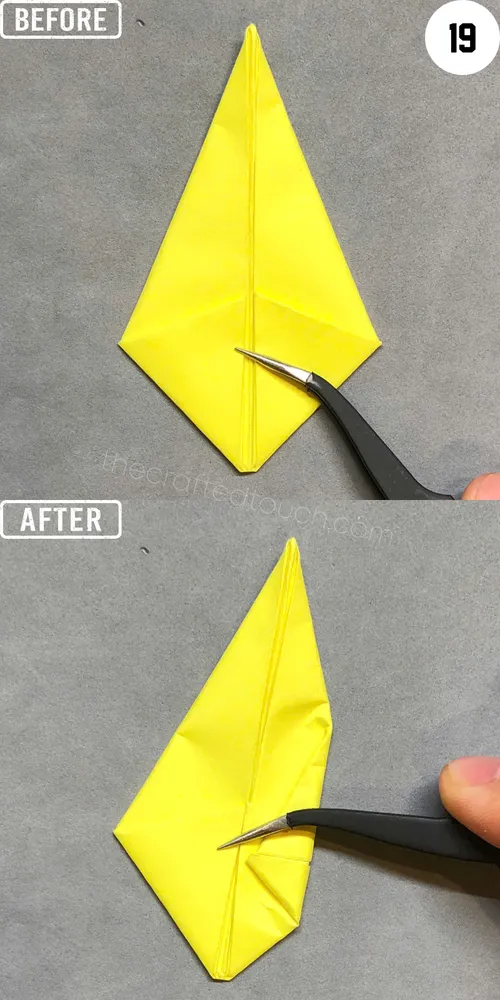
Step 20
I do the same with the left corner, folding it to the right so both sides look the same.
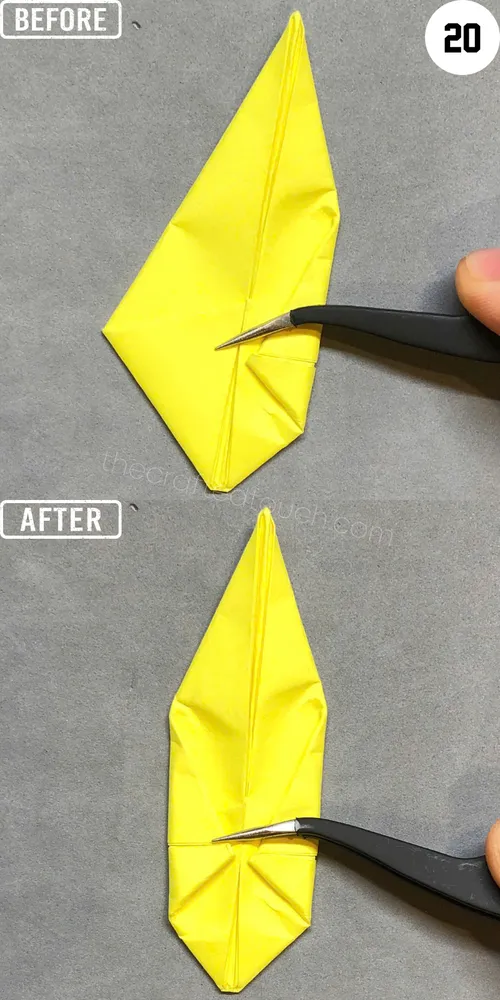
Step 21
Then I fold the paper in half vertically, following the crease that’s already there.
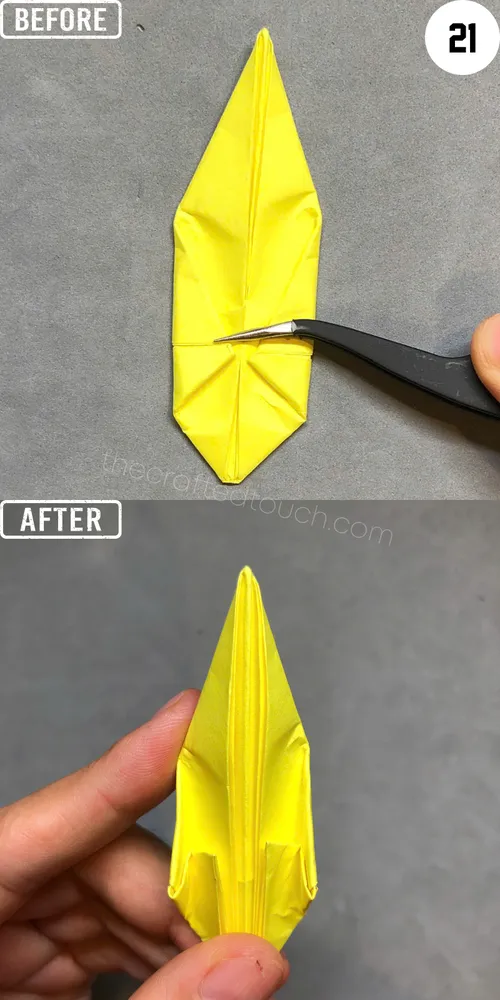
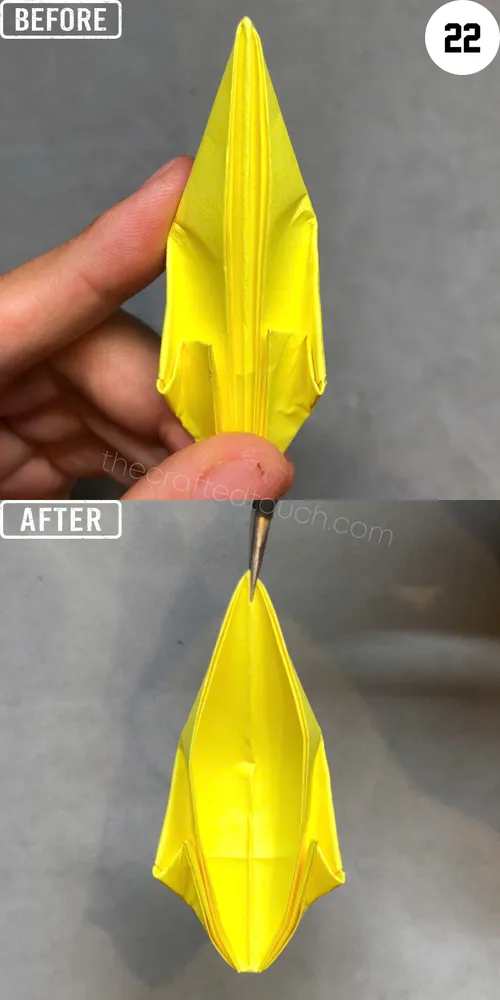
Step 22
With the middle part inside the paper, I press it down while gently pulling the two side edges outward at the same time to create a sunken area in the middle of the boat.
Step 23
Now I press the right side of the boat using my index finger so the boat’s edge folds inward.

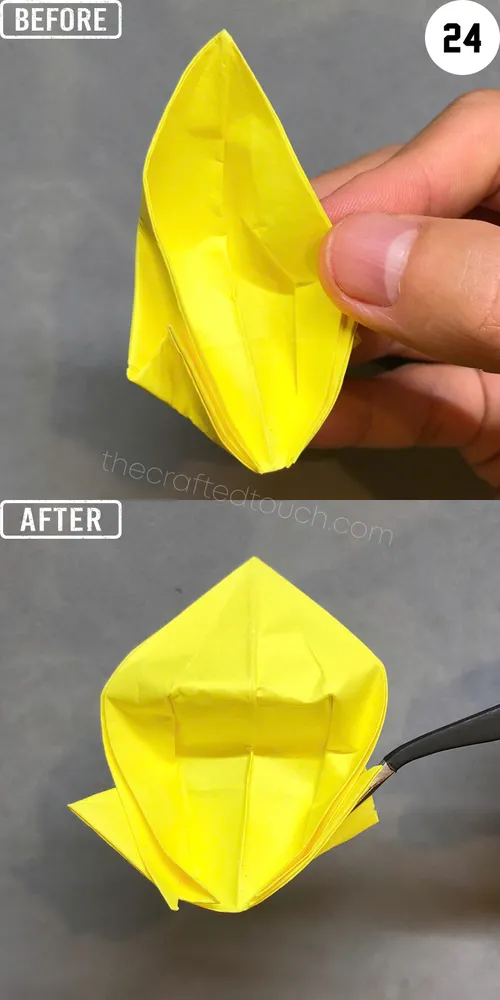
Step 24
I do the same with the top left side, pressing it in so it matches the fold on the right.
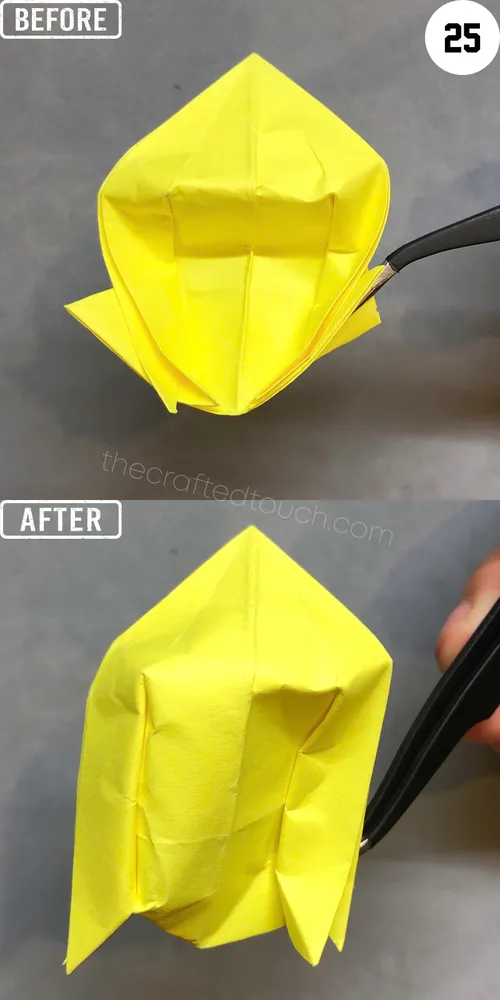
Step 25
After that, I start with the left side. I press the dent inside the boat from the back so it pops up to the top.
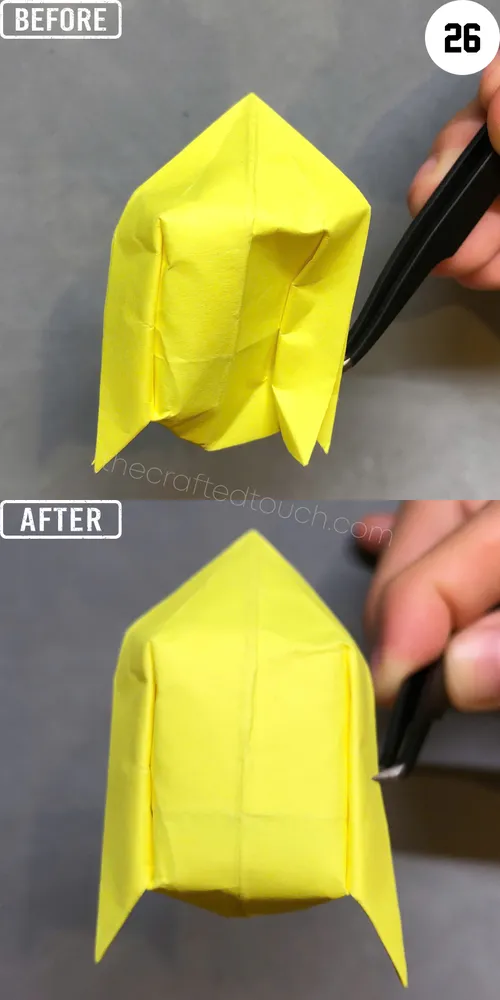
Step 26
Now I press the squished part on the right side from behind so both sides look the same.
Step 27
Now I flip the folded paper over. It’s starting to look like a boat, isn’t it?
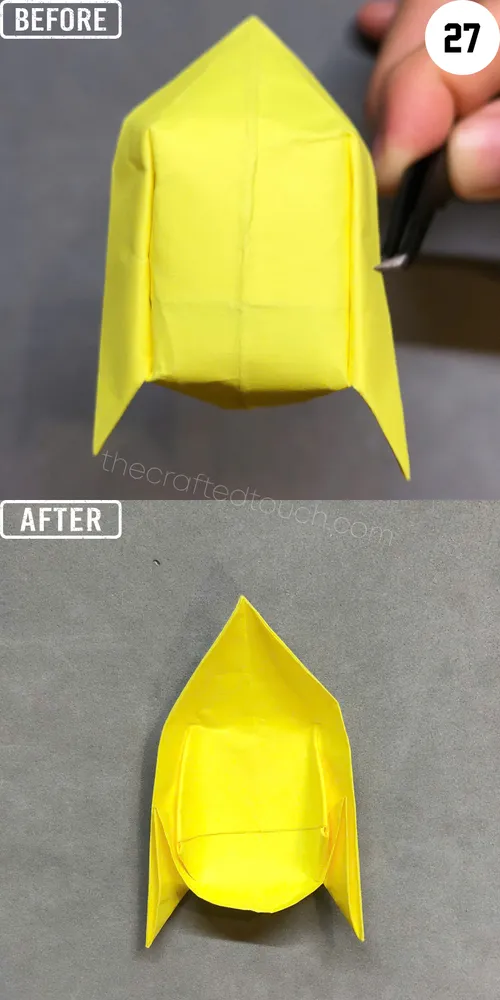
Step 28
Now I lift the folded layer inside the boat and line it up carefully so it looks nice and even. This makes a fun design inside the boat.
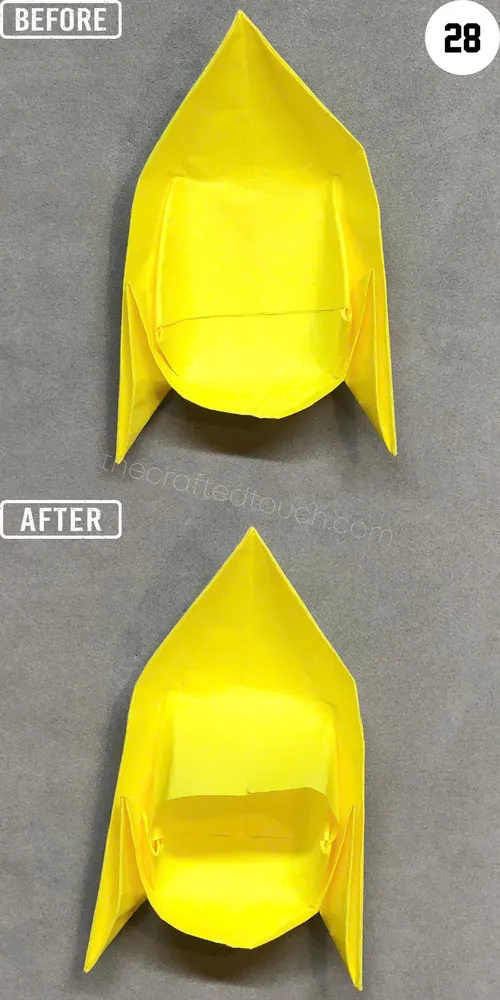
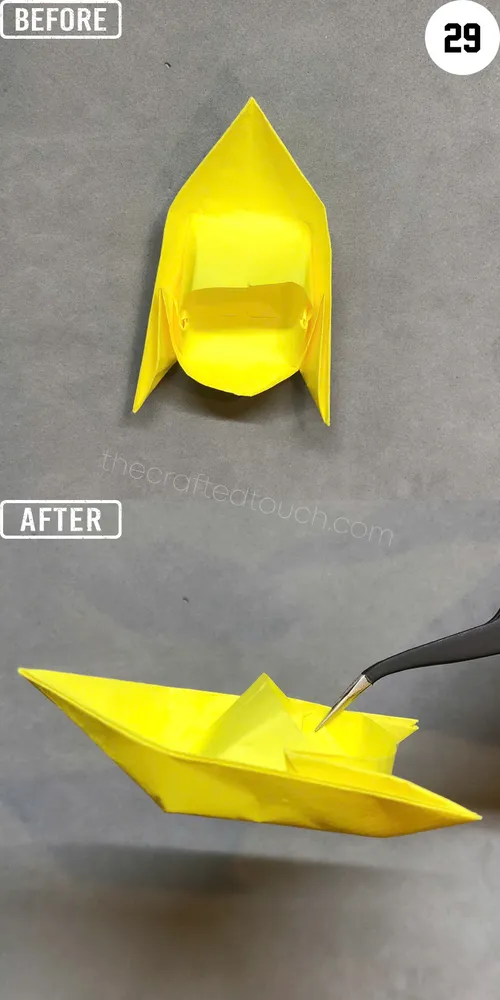
Step 29
After folding and fixing everything so it looks nice and even, I’ve finished making my paper boat. Does it look nice?
Tips for better result
| Tip | Description |
| Make strong folds | Press down each fold using your fingernail or the edge of a ruler so the boat stays firm and doesn’t fall apart easily. |
| Take your time | Go slowly and focus on each fold. If you rush, the boat might end up uneven or look squished. Folding slowly also helps you enjoy the process more. |
| Use rectangle paper | Make sure your paper is a rectangle, not a square. You can ask an adult to help cut it if needed. A regular notebook sheet can also work if it’s not too thick. |
| Fix folds early | If a fold looks a little off, open it up and fix it before moving on. This makes the final boat neater. |
| Try more than once | Practice a few times with extra paper so you feel confident before making your final boat. The more you try, the better your boats will look. |
| Have fun decorating | When you finish, try coloring your boat, drawing a flag, or even giving it a name like a real ship. You can also make a little sea using blue paper or draw waves |
Conclusion
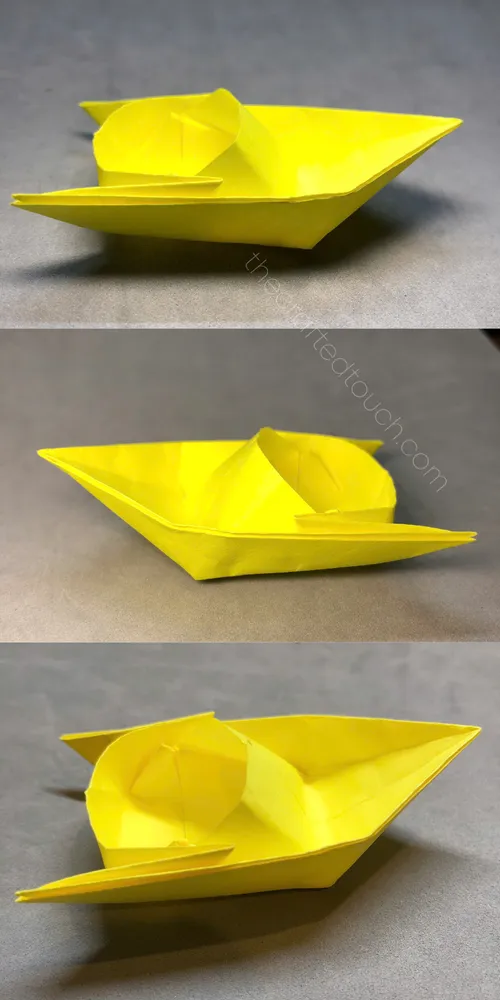
Now you’ve made your very own paper boat! Great job folding each step carefully and taking your time. Whether you float it in water (with grown up help) or just use it to decorate your room, your boat is something you made with your own hands.
You can try making more boats using different colors or even draw tiny people inside for fun. Keep practicing, stay patient, and you’ll get better and better at origami. Happy sailing.
